PART III | LESSON 8: FLOW BEFORE EQUIPMENTMATERIAL HANDLING ACADEMY
DRIVING QUESTIONWhat does material actually do in this building, before I draw any equipment?
A NEW ENGINEER, A FLOOR PLAN, AND A BRIEF
Sit a new engineer down with a floor plan and a project brief and watch what happens. They see a dock door and think induction belt. They see open floor and start drawing conveyor runs. They see the pack stations and route a takeaway toward them. Piece by piece the drawing fills in. By the time they're done they've got a layout.
What they don't have is a design. The gap between those two words is the whole lesson, and it's why this is the first lesson in the program that never opens a calculator.
By the end of this lesson you should be able to tell the full story of a system as blocks and arrows before any equipment exists, draw outbound, replenishment, returns, and exceptions as separate flows, and label every assumption in that story as safe or unsafe so you know which ones to verify before you commit.
A layout, and a design
A layout is equipment arranged on a floor plan. It accounts for the machines that came to mind and fits them into whatever space is open. A design is the controlled, logical movement of material through a building, worked out before any machine gets a name. The layout starts from the hardware. The design starts from the flow. Same building, same products, two completely different starting points, and the starting point decides everything after it.
Here's the trap. A layout looks finished. It fits the floor, it's tidy, every machine has a home. What it skips is the thinking underneath: where material actually needs to go, in what order, and where it might have to wait. That work never happened, so the gaps don't show on paper. They show up on the floor, after go-live, once the building gets busy.
FIELD INSIGHT | MICHAEL COLLINS
The mistake is almost never technical. A new engineer who starts with equipment is not making a calculation error. They are making a conceptual error. They are asking where this equipment goes instead of how material should move through this building. Those two questions produce completely different starting points, and the starting point determines everything.
Why equipment-first fails under stress
Equipment-first thinking fails for reasons that all trace back to one thing: it plans for the machine instead of the movement. It designs around the hardware that comes to mind first rather than the flow the operation needs. It optimizes for open space instead of the path material has to take. It skips the question of where product might have to wait. And it produces a design that runs fine while the building is calm.
Calm isn't the test. Systems get stressed. Waves release, volume surges, a downstream station slows and the queue backs up behind it. If the layout was drawn only for average conditions, none of those events are design problems. They're failures. A design built around the flow handles stress because the flow accounted for it. A layout built around equipment handles the equipment, and discovers the stress after go-live.
You'll run a structured version of that stress test, the actual script of what-ifs, in Lesson 10. For now the point is narrower: stress is exactly where an equipment-first design breaks, and good hardware never rescues a flow that was never designed.
DESIGN PRINCIPLEFlow before equipment.
If the flow is wrong, so is every layout built on top of it, and no equipment corrects a flow problem after the fact.
Blocks and arrows before equipment
Before any drawing tool opens, the flow gets mapped as simple blocks and arrows. Each block is a process step or a functional area. Each arrow is a movement of material. The diagram doesn't show equipment. It shows what happens, and in what order.
A block might read receiving, quality check, bulk storage, replenishment staging, pick face, induction, sortation, pack, consolidation, or dispatch. The arrows carry material between them. Where the flow splits, the diagram branches. Where it combines, the diagram merges. Where a decision gets made, you mark a decision point. That's the whole vocabulary, and you can draw it on a whiteboard.
The test for whether the diagram is finished is plain: can you read it out loud, start to finish, as a coherent story with no gaps? Material arrives at the dock, goes through a quality check, moves to bulk storage. An order releases, product gets pulled to the pick face, travels to induction and sortation, lands at a pack station, and consolidated orders go to the dispatch dock. If that story has a transition you can't explain, or a stage nothing arrives into, the diagram has a gap that becomes a problem in the layout.
PROCESS FLOW DIAGRAM CHECKLIST
Every entry point for material is shown: dock doors, returns, replenishment from bulk, manual induction points.
Every exit point is shown: dispatch docks, returns processing, exception handling, manual divert lanes.
Every decision point is marked: scan-based routing, weight-based rejection, manual inspection.
Every split and every merge is shown, with all branches accounted for.
Every place where material may have to wait is marked, before any conveyor type gets chosen.
Replenishment and returns appear as distinct flows with their own paths, not footnotes to the outbound flow.
The whole thing reads out loud as a complete, unambiguous story.
WHYIt forces you to understand the operation before you draw equipment. And it's the first thing you share with the customer, so agreement on the flow means they've confirmed you understood their process before you designed anything around it.
WHENBefore any equipment gets selected and before any drawing tool opens. Flow comes first; equipment is placed to support it, not the other way around. Not when: Don't draw it from the equipment already sitting in your head, and don't build it without your discovery inputs. A flow diagram drawn without the requirements document, the MTBH, and the envelope is a guess about the customer's operation dressed up as a design.
WHEREThe first deliverable in every system-design engagement. It comes before the equipment schedule, the layout, the rate calculations, and the technology selections.
FAILURE IF IGNOREDThe conveyor fits the floor perfectly and hits every rate target on paper, then falls apart the first time a wave releases, because nobody designed for what happens when a mass of cartons hits at once. The equipment was right. The flow was wrong.
STOP AND THINK
Read your flow diagram out loud, start to finish, as a story. "Material arrives at the dock, goes through a quality check, moves to bulk storage..." Keep going. If you hit a transition you can't explain, or a stage with no arrow into it, you just found a gap. Find it now, on paper, where it costs nothing.
Four flows, drawn separately
A flow diagram earns its keep by making each material flow visible as its own path. Outbound cases, replenishment from bulk to the pick face, returns, and exceptions all start in different places, end in different places, and often need different handling. Drawing each one on its own surfaces its volume, its rate, and its package condition, which tells you whether two flows belong on a shared path or separate ones.
Replenishment from bulk storage to the pick face gets drawn as its own flow. Leave it off and its volume never gets evaluated, so it never factors into the design. Returns get the same treatment: volume, rate, and package condition understood and drawn before any design decision. Exceptions are the flow that tends to get left out entirely. They need a defined path to a staffed station and a defined path back into the flow once they're resolved. Without both, the diagram has a gap waiting to become a jam.
So draw each flow independently first. Once each one is fully defined, you might find that combining two of them makes sense, and adding a branch to bring them together is straightforward. Undoing a flow you combined before you understood it costs far more. Whether the combined flows should share infrastructure is a technology call that lands later, in Part IV. Your job now: get every flow onto the page so the question can even be asked.
COMMON MISTAKE
Treating replenishment and returns as footnotes to the outbound flow. It feels efficient. Everything's moving the same direction anyway. But each one has its own volume, its own timing, its own package condition, and when they share the outbound path without being designed for it, they create conflicts you can't resolve without a redesign. Draw them separately from the start. Combine later, if it earns its place.
Safe assumptions, and unsafe ones
Every flow diagram is built on assumptions. You assume a peak volume, a product dimension, a dwell time, a package condition. Some of those assumptions are safe and some aren't, and the difference is worth a habit.
A safe assumption is one where being wrong is easy and cheap to fix. An unsafe assumption is one where being wrong forces a redesign. Peak volume projections are unsafe. Product dimensions handed over by the customer are unsafe. Get either one wrong and the flow you drew around it doesn't need a tweak, it needs to be redone. So label every assumption by type, right on the diagram, the moment it appears. Then verify the unsafe ones in writing with the customer before the design goes any further. Knowing which assumptions carry risk and which don't is one of the highest-leverage judgment skills in the program, and it starts with the plain habit of labeling them every single time.
PRO TIP | MC
If you're about to write an assumption onto the diagram, a peak number, a product dimension, a dwell time, then label it safe or unsafe before you move on. Tradeoff: it feels like over-documenting a diagram that's supposed to be quick and loose. Verify: the unsafe ones, the ones where being wrong means a redesign, are the numbers you confirm in writing with the customer before the design goes another step.
RIVERSIDE PROJECT
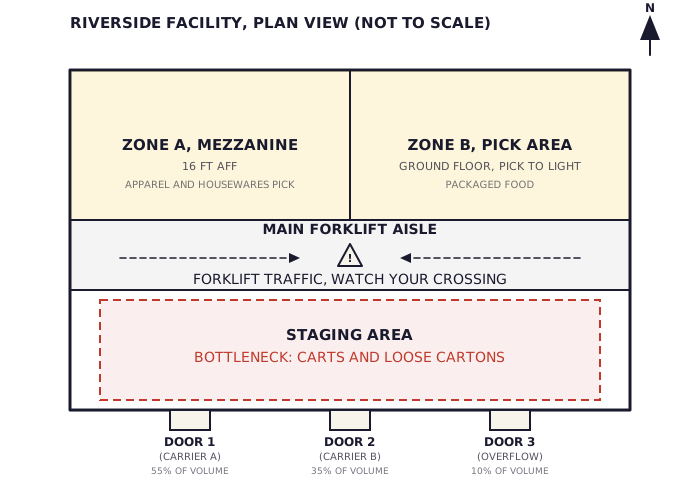
Dana walks you through the building. Michael comes along without being asked. That tells you something. You start at the dock doors on the south wall: three of them, two with trailers backed in, one empty. The staging area in front is crowded with carts and loose cartons. North sits Zone B in the northeast quadrant, ground-floor pick-to-light, packaged food. Northwest, up the stairs, Zone A rides the mezzanine at sixteen feet, apparel and housewares, and those carts have to come back downstairs before they reach the dock. Here's the plan you're about to draw against.
Riverside facility, plan view. Read your flow diagram against this floor while you draw it.
Close your eyes for a moment
You are not a cart. You are a carton. You just got picked on the second floor. You are in a corrugated box. You weigh 12 pounds. You are 13 inches long, 9 inches wide, and 3 inches tall. How do you get from the second floor pick shelf to Dock Door 1 on the south wall?
Trace that journey. Every transition. Every moment where something could go wrong. Every point where you have to wait. Every point where you change direction. Do this before you draw a single line.
Your work | Layer 1: Process Flow Diagram
Produce a Layer 1 process flow diagram that shows both pick zones as separate starting points, Zone A on the second floor and Zone B on the ground floor; the path each carton takes from its pick zone toward the dock doors; the point where the two flows merge; the sort decision point where the system determines which door each carton goes to; and the three dock-door destinations. Use blocks and arrows only. No equipment. No dimensions. No speeds. Just the story. Read it out loud when you're done. If you can't narrate it as a clear, logical story without stopping, the diagram has a gap.
You're not adding rate or people yet. That's Lesson 9. Right now, just the story.
FOREST THROUGH THE TREES
This is Lesson 8 of thirty-five, and it's the one the rest of Part III grows out of. Nothing you drew today selected a conveyor. What you produced is the one document every later part builds on: the flow, as blocks and arrows, confirmed as a story. Lesson 9 adds volume, delays, and buffers to this same diagram. Lesson 10 pushes rate through it until it gets real. Part IV finally places equipment, on top of the flow you drew here. Get the flow right and everything downstream stands on something solid. Get it wrong and even a careful layout is built on sand. Flow before equipment. This is where that starts.
CHECKPOINT
Explain the difference between a layout and a design. Then give one specific decision a layout-first approach produces, for example routing a takeaway to the pack wall because that's where the pack stations already sit, and explain why a flow-first approach would land somewhere different and better.
You draw a flow diagram for a distribution center. It shows induction, a scan-based sort decision, a path to packing, and a path to a manual review station for cartons the scanner cannot read. Reading the diagram out loud, you can explain how a carton gets to the sort decision and how a carton gets to packing. What you cannot explain is how a carton sent to manual review ever gets back into the flow. What have you found, and why does catching it now, on paper, matter more than catching it after the equipment is installed?