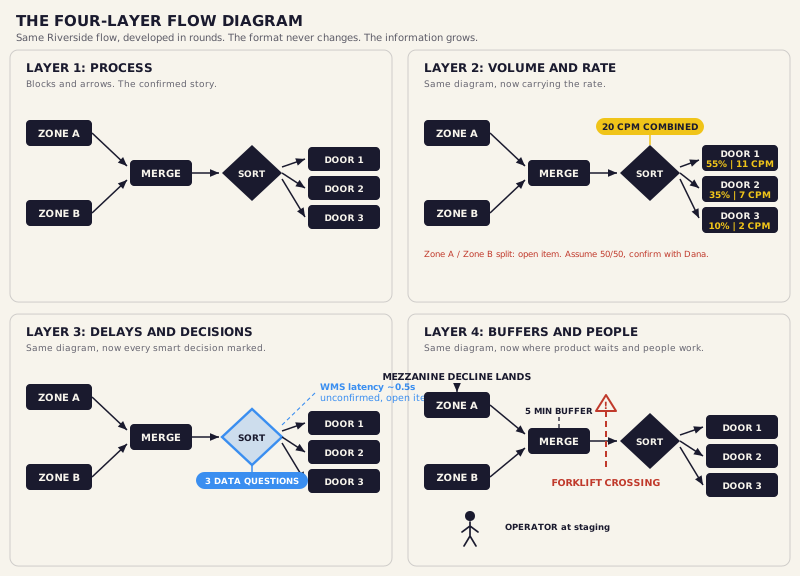
Last lesson you walked out with something small and hard-won: Riverside's Layer 1 flow. Blocks and arrows, both pick zones as separate starts, the merge, the sort decision, three dock doors. Dana looked at it and agreed that's her operation. That agreement is the whole point of Layer 1, and it's the thing you can't skip.
Here's what happens next, and it surprises new engineers every time. You don't open a new document. You don't start a drawing. You pick up the same diagram you just got signed off and you start adding to it. Round by round, it grows from a picture of what happens into a specification of what the system has to do. The format never changes. The information on it does.
By the end of this lesson you should be able to develop a confirmed Layer 1 flow into a four-layer design map, adding volume and rate, then delays and assumptions, then buffers and people, and mark the three data questions at every smart decision point so the controls team knows exactly what the system has to decide, long before you tell them how.
Every layer takes something that was implicit back in discovery and makes it specific and measurable. Dana told you she wants the system designed for 20 cartons per minute. That fact lived in your notes. Layering puts it on the diagram, at the exact spot it applies. She told you the volume splits 55, 35, 10 across the three doors. Same thing. It moves from a memory to a number written on a line. This is the bridge from the discovery phase to the engineering phase, and the good part is you're not translating your work into a new language. You're deepening the one drawing everyone already agreed on.
The first round of detail is throughput. On every stage of the flow, you note the rate the system has to carry there: cartons per hour or per minute, the peak conditions, any seasonal note the customer gave you. For Riverside that means writing 20 CPM at the combined output, then splitting it back across the three doors by Dana's percentages, then working that rate back through the merge to each pick zone's throw-on line. Now the diagram doesn't just show that product flows from Zone A to the merge. It shows how fast.
This is the layer that reveals where the system has to work hardest and where you have to reserve capacity. A section carrying 11 cartons a minute has a different job than one carrying 2, and until the rate is on the paper, they look identical. Note the rate at each stage and the busy spots announce themselves.
One discipline to hold here: Layer 2 records what the rate needs to be. It doesn't work out what that costs in belt speed. Turning 11 CPM into a required feet-per-minute, deciding whether you design to peak or to average, applying the plus or minus 10 percent solutioning tolerance, all of that waits for next lesson. Layer 2 sets the target. Lesson 10 works out what the target costs in speed and whether the flow still holds when you push it.
The second round adds the things that are true but easy to leave unsaid: dwell times, manual process speeds, scan rates, the constraints you already know about. Its real work is making implicit assumptions explicit so they can be challenged before they turn into design errors. Carry the safe and unsafe habit forward from last lesson. An unconfirmed number on Layer 3 isn't a fact yet. It's an open item, and you mark it as one.
Layer 3 is also where you mark every point the system makes a decision. Scan-based routing. Weight-based rejection. A manual inspection call. At Riverside the big one is the sort: a carton arrives, something reads it, and the system decides which of three doors it belongs to. That's a smart decision point, and every smart decision point on your diagram is going to have to answer the same three questions. Your job right now is to write those questions down at each one. Not to answer them. To prove the decision is fully described.
At every smart decision point on the diagram, mark these three questions:
Then carry one more with them: what happens if the answer does not arrive in time? You're only planting these questions. Mark them at every smart decision point on the diagram. How the system actually answers them, the scan, the query, the response, the fallback, is controls work, and that comes later, in Part V.
Take Riverside's sort decision point, where the system reads a carton and decides which door it goes to. Ask the three data questions about it, out loud. What does the system need to know? Who tells it, and from where? What happens if that answer is late? You're not solving the controls yet. You're proving the decision point is fully described.
The last round is where the diagram grows up. Two things go on: where product waits, and where people are.
Buffers first. Anywhere material may sit, you note it as an explicit requirement: where it waits, how long, what feeds that wait, and what drains it. A note like partial accumulation needs five minutes of buffer defines the accumulation requirement before anybody selects an accumulation conveyor. That's the sequence you want. The requirement gets written on the flow. The equipment answers to it later.
Then people, and this is the part that separates a clean drawing from a workable one. A maintenance tech has to reach every drive, every motor, every take-up, and every zone controller without pulling product out of the system or standing in a live traffic path. An operator needs room to work and a sight line to what's arriving and what they're sending. Safety paths have to be separated from moving equipment. A layout that ignores all this looks clean on paper and creates daily friction on the floor. Worse, it guarantees maintenance gets deferred, and deferred maintenance is how a system quietly becomes a system failure.
Here too you write the requirement, not the solution. Layer 4 says this buffer needs five minutes, this many cartons at peak, and it cannot back up into upstream equipment. Turning five minutes of buffer into a zone count, a zone length, and a release mode is accumulation design, and that's Part IV. You're defining the need. Someone sizes it later, and they can only do it well if your note is specific.
Writing vague buffer notes. "Needs some accumulation here" isn't a requirement, it's a shrug. It produces a vague accumulation design in Part IV that nobody can size or defend. Write buffer notes as explicit, measurable requirements: needs five minutes of buffer, must absorb this many cartons at peak, cannot back up into upstream equipment. Specific notes produce specific requirements that can be engineered to.
If you've got Layer 4 down on paper, then drop operator and maintenance-access symbols onto it before you call it done. Tradeoff: it clutters a diagram you thought was finished. Verify: watch what the symbols change. The moment you draw where a tech has to stand to reach a drive, or where an operator needs a sight line, you'll find a wait point or a path you drew without a person in mind.
By the time all four layers are on the diagram, it carries enough to drive conveyor selection, accumulation sizing, speed calculations, sensor placement, and controls architecture. It's not a finished engineering document. It's the thing every finished engineering document traces back to.
Once I build the flow diagram and get buy-in from the customer, the next step I take is to add details to that same flow diagram. Volume and rates, delays, assumptions, and notes. On a line in the diagram from a throw-on area at the dock to the storage area I might have a note that says partial accumulation needs five minutes of buffer. As I add layers to the diagram it becomes the map for the conveyor design. Every accumulation section, every speed decision, every sensor placement I make later traces back to a note on that diagram.

The Quoting Standards Guide, Part 1, makes the stakes plain. Layer 1 tells you what the system needs to do. Layer 2 tells you what rate it needs to do it at. Layer 3 tells you where every smart decision is made and what it requires. Layer 4 tells you where people are and what the maintenance team lives with for the next ten years. A quote built from a complete four-layer diagram can be defended line by line. A quote built before it's complete is built on assumptions, and when the assumptions are wrong, the cost comes out of margin.
Michael puts it harder than that. In the Quoting Standards Guide he says a quote without a flow diagram behind it isn't a quote at all. It's an estimate with a BOM attached. Everything you place on top of this diagram in the parts ahead, the equipment, the speeds, the sensors, the controls, stands on the four layers you build here.
Take your confirmed Layer 1 diagram from last session and complete the other three layers on it. Same diagram. Don't start a new one. Keep the facility plan next to you as you go, so the forklift crossing and the mezzanine landing read against the floor.
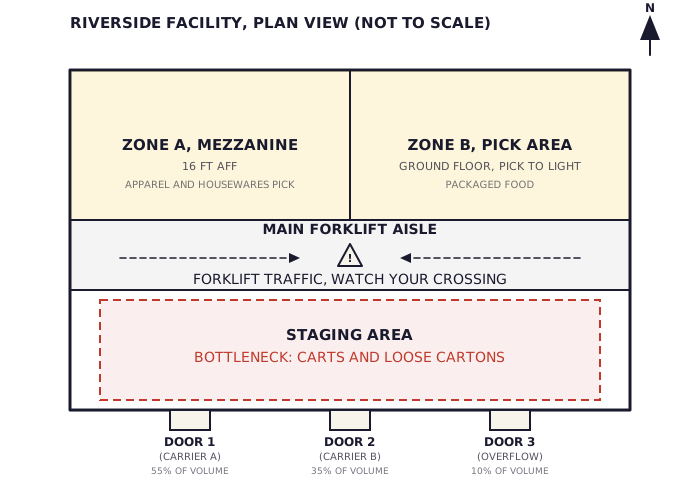
Riverside, plan view. Your Layer 4 notes land here.
Layer 2, volume and rate. Work backward from the 20 CPM combined output. Split it across the doors by Dana's percentages, 55 to Door 1, 35 to Door 2, 10 to Door 3, and work the rate back through the merge so each zone line carries a number. Dana never gave you the split between Zone A and Zone B, so that's an open item. Make a defensible, labeled assumption and flag it to confirm with her. Don't compute belt speeds yet. That's next lesson.
Layer 3, decisions and open items. Mark every smart decision point, above all the sort, and write the three data questions at each one. Note Ray's WMS latency as an open item, and mark where it becomes a design constraint once the confirmed number arrives. Here's what Ray told you in the room:
"Honestly? Off the top of my head I would say half a second. Maybe less on a good day. But I am going off memory. I should confirm that with our IT manager before you design anything to it."
An estimate he flagged himself. It goes on Layer 3 as an open item, not a fact. You plant the questions here. You don't design the controls.
Layer 4, buffers and people. Mark where operators work alongside the system, where the forklift crosses the conveyor path and what that crossing requires, where the mezzanine decline lands, and every accumulation point. Michael gave you the two constraints he flagged, standing at the edge of the mezzanine:
"That mezzanine edge is going to be your challenge. Whatever comes down from up here has to land somewhere before it can go south."
And on the aisle below: "We had two near misses last year. Carts coming down from upstairs crossing paths with a forklift in the main aisle. Nothing happened but it was close."
When all four layers are down, hold it to the standard: a knowledgeable person could read your diagram and understand the system intent, the rate requirements, the control logic, and the physical constraints, without asking you a single question. Date the entry in your Riverside note. That's your deliverable for this lesson.
This is the document the rest of the program builds on. Part IV places equipment on top of these four layers. The speed math in the next lesson reads its rate notes. The accumulation design in Part IV reads its buffer notes. The controls architecture in Part V answers the three data questions you're planting today. Nothing you do downstream is stronger than the diagram it traces back to. Get all four layers right, hold every note to the specific-and-measurable standard, and every lesson after this one starts from solid ground instead of a guess.