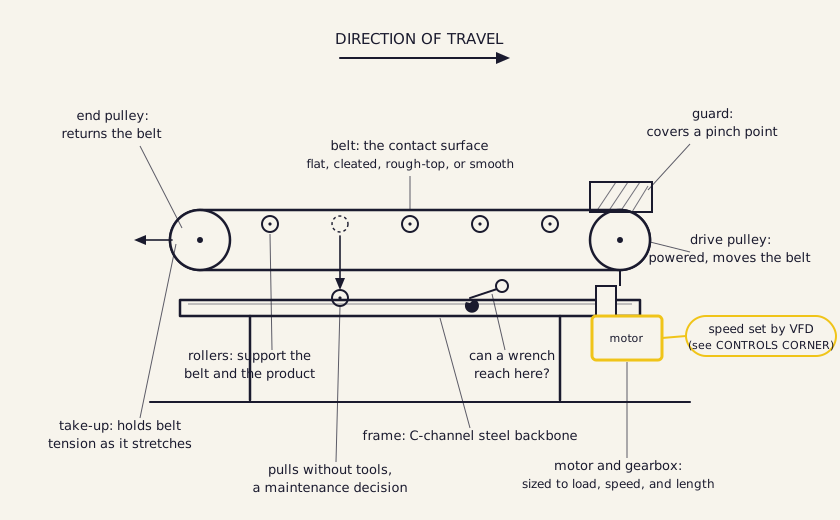
A conveyor isn't a drawing. It's a machine that runs two shifts a day in a real building, with real dust, real temperature swings, and a maintenance team that might be one person fixing whatever broke last night. The drawing shows you steel. It doesn't show you the wear.
Every component on a conveyor was built the way it was for a reason. The frame is a certain steel because of the load. The rollers come out without tools because someone has to pull them. The drive is sized to the weight, the speed, and the length of the line. Learn the reason behind each part and you can walk up to a conveyor you've never seen, read it from its components, and know how it'll behave before anyone hands you a spec sheet. Trust the spec sheet instead and you're taking a vendor's word for how a machine runs in a building he's never stood in.
By the end of this lesson you should be able to name every major component of a conveyor and say what job it does, look at any conveyor you've never seen before and evaluate it from its parts, and read a customer's maintenance reality well enough to know that the most capable conveyor and the right conveyor aren't always the same machine.
A conveyor is built from a short list of parts. Learn what each one does and why it's shaped that way, and you can evaluate any conveyor on the market instead of only the ones you've already seen. Here they are, one at a time, function first.
Notice the thread running through all of it. Frame width comes from belt width, and belt width comes from the package analysis. Roller centers come from the smallest package. Drive size comes from the weight and rate. Not one of these parts is a free choice. Every one of them answers back to something the product already decided, which is exactly why naming the part is only half the job. The figure below is the whole vocabulary in one sketch.
Picture a belt conveyor that has run two shifts a day for a year. Name three things on it that aren't the same as the day it was commissioned. Now name which of those three a one-person maintenance team would actually catch before it caused a jam. No calculator. Just the machine and the person who has to keep it alive.
A list of parts isn't the point. The point is which of those parts wears, degrades, or gets stuck, and whether the customer's people can keep it running. That's the read that separates an engineer who evaluates a conveyor from one who just recites its catalog page.
Start with the wear you can name. Belts stretch, so they need retensioning, which is why the take-up is there. O-rings dry out. Bearings fail. On a pneumatic system the air fittings, filters, and dryers all need service, and the air itself has to stay clean and dry or the machine gets unpredictable. That's all ordinary wear, the kind a machine takes on when it runs sixteen hours a day in a working building.
Then there's the one nobody draws on the layout: access. Two units butted up side by side, and can you even get a wrench between them? Can you pull a motor or a shaft without dismantling half the line? Is there room to swap a bearing? A conveyor that's perfect for the product but unreachable for the customer's team isn't a working system. It's a failure on a delay. It runs beautifully at go-live and degrades from the day the first thing wears, because the person who has to fix it can't get to it. That's where matching the conveyor to the maintenance reality stops being a slogan and becomes a design habit.
The next lesson turns this instinct into a decision, whether a given point in the system should move product or hold it, and it puts these same two Riverside failures under a real diagnosis. Hold that. Here the job is only to hear what wears and who has to reach it. The formal side of this, the failure-rate and spare-parts discipline that quantifies reliability, is its own lesson further on. Right now you're building the instinct, not running the analysis.
Designing a line you can't service. Two 24-inch units butted together, and now there's no room to get a wrench in, no room to pull a motor, no room to swap a bearing. It all fit on the drawing. It doesn't fit a maintenance guy at 2 AM with a jam and a flashlight.
If you're placing two conveyor sections close together, or specifying anything that needs regular service, then physically check the access before you commit the layout: can a person reach the fasteners, pull the motor, replace the component. Tradeoff: it costs a little floor space to leave service clearance. Verify: walk it as the maintenance person, not the package. If you can't picture getting a tool to every wear part, the layout isn't done.
Everything you carried in from Lesson 10 was calculated for a perfect world. In that world the belt is new and holds exactly the commanded speed, every roller spins free, the cartons arrive square, and the temperature never moves. The real building isn't that world, and it never was.
Belts break in and stretch, so tension drifts. Products show up in whatever orientation the picker set them down in. Rollers wear. Temperature changes belt stiffness and how the motor pulls. The calculated number was right for the perfect world. Your job is to decide how much margin the real one needs before that number turns into a specification you sign your name to.
How much margin, and the method for setting it, is its own lesson later in the program. Name the principle here and carry it. Part IV is where you first put your hands on real steel, and this is the idea that keeps that steel honest all the way to the end.
Always ask about maintenance capability early, and not just whether they have a team. Ask what that team actually does. A place that only fixes what breaks needs a simpler, more durable conveyor than a place with a real PM program. When you're not sure whether a point just needs to move product through or will sometimes need to hold it, default to holding it, because you can always run an accumulation conveyor straight through, but you can't add accumulation after it's installed. And where there's no maintenance to speak of, a motor-driven roller system can be a good choice. It just usually costs more. Match the machine to the reality, not just the product.

You've met Michael Collins, Riverside's facilities and maintenance lead, a team of one. When you asked what happened with the last two systems, here's what he told you, word for word.
"First one was a pneumatic accumulation system. Worked fine for about four months. Then the compressor started having issues. Air pressure would drop during peak volume and the zones would stop releasing cleanly. Maintenance calls started coming in. Nobody was trained to work on it. The vendor sent someone out twice. After that the operators started pushing product around the jammed zones by hand. Six months after install it was off and we were back to manual."
"Second one. When anything downstream slowed down, everything stopped. The whole line. Every time. We lasted three months before it came out."
Don't diagnose the technology yet. That call is the next lesson, and you'll make it there. Right now, read each story as a machine, not a verdict. The first is a machine whose zone behavior leaned on an air supply the building couldn't hold steady, built from parts nobody on site could service. The second is a machine with no way to hold product on its own, so one slow spot downstream took the whole line with it. Both ran into the same wall Michael keeps pointing at: a maintenance team of one.
Write your component-and-maintenance read note. Two or three sentences per failure: what kind of machine failed, and why it failed in this building. Don't name the replacement. That's next lesson's work.
This is the opener of Part IV, where the design stops being diagrams and starts being steel. Everything ahead of you here, the accumulation, the curves and declines, the transfers, the sorter, is built from the parts you just named. Every one of them wears, and every one of them has to be reachable by whoever keeps the building running. Carry the anatomy and the maintenance instinct together. The engineer who can name a component but not what fails in it hasn't finished learning the part. The one who can name both is the one who reads a conveyor from its steel and gets the call right.
A conveyor's drive doesn't just switch on. On a lot of systems the belt has to come up to speed gently and slow down gently, and that's the job of a variable frequency drive. A VFD sets belt speed electronically, so the same conveyor can run at different rates as the operation changes, and it ramps that speed up and down instead of slamming the belt from stopped to full and back. Some conveyors flat out require it, because a hard start throws product around and a hard stop tips it over. That soft start and controlled ramp is a genuine advantage, and it's also a cost. Here's the control reality: the VFD is the piece that turns "how fast should this run" from a mechanical fact into a number somebody sets and tunes. How that number gets set, and how the ramp time gets programmed, is Part V, Lesson 20. For now, know that the drive is the first place the controls system reaches into the steel.