MATERIAL HANDLING ACADEMY

Part IV. Lesson 13. Accumulation Design.

DRIVING QUESTION How much accumulation does this buffer need, and how should it release?
PART IV | LESSON 13: ACCUMULATION DESIGN

A buffer is a question with a number in it

You've decided a point in the system needs to hold product. Good. That's a call, not a design. Saying "we need accumulation here" gives the drawing nothing it can build from. The real question sits underneath it: how long might the process downstream not be ready, and how much product piles up behind it while it waits?

Accumulation design is where "we need a buffer" turns into "we need eleven zones at thirty inches each," and where how the product lets go stops being an afterthought and becomes a decision you make on purpose.

PART IV | LESSON 13: ACCUMULATION DESIGN

From Buffer Time to Zones

Zone count = how long downstream is out × how fast product arrives. Add margin for the wave you haven't watched yet.

Zone length = the longest package plus its gap. Check the shortest case too, so a zone tuned for the big carton still senses the small one.

Weight-per-zone gate. A loaded zone carries the full weight stacked in it. Run the heaviest case against the motor-driven-roller rating. Past it, MDR is out.

PART IV | LESSON 13: ACCUMULATION DESIGN

Size It, Then Choose How It Releases
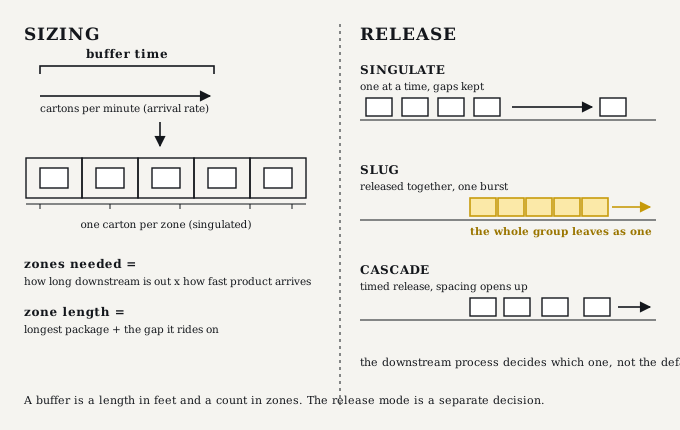
Two-panel figure. Left, sizing: a buffer-time bracket over a cartons-per-minute arrow resolves into a row of accumulation zones holding one carton each, with the rule that zones needed equals how long downstream is out times how fast product arrives, and zone length equals the longest package plus its gap. Right, release: three rows of accumulated zones at the moment of release, singulate letting one carton off with gaps kept, slug releasing the whole group at once in gold, and cascade releasing in a staggered stairstep, captioned that the downstream process decides which one, not the default.
Sizing on the left, release on the right. One turns a buffer into feet and zones; the other decides how it lets go.
PART IV | LESSON 13: ACCUMULATION DESIGN

Release Modes

Singulate

The default. One package per zone, and each zone releases the moment the zone downstream clears. If the zone ahead is empty, the package rides straight through.

Slug

All the accumulated zones release together as a single group. You reach for it when the thing downstream wants product in a controlled burst, a sorter induction being the classic case.

Cascade

The same, with a timed delay between zones, so the group leaves with more space built in. On a pneumatic system it also softens the shock load.

PART IV | LESSON 13: ACCUMULATION DESIGN
WHYA buffer requirement is a number. Size it from the downstream unavailability and the arrival rate and you build exactly enough zones. Guess it, and you either starve the buffer or pay for zones you never fill.
WHENAfter the transportation-vs-accumulation call, at every point the rule of accumulation flagged, using the rate targets and the envelope you already have in hand.
WHEREIt sets the run length on the drawing and the release behavior in the controls spec. Two deliverables from one sizing pass.
NOT WHENDon't size accumulation by feel or by whatever length fits the floor. And don't leave the release mode on default because the conveyor shipped that way. A sorter induction that needs a slug won't perform on one-at-a-time release, no matter how well you sized the zones.
FAILURE IF IGNOREDYou build ten feet of accumulation where the buffer needed thirty, and the first real wave backs product up past it and stops the line. Or you feed a sorter singulated when it needed a slug, and the sorter starves between cartons and never hits rate. Both look like sorter problems at go-live. Neither one is.
PART IV | LESSON 13: ACCUMULATION DESIGN
PRO TIP | MC

If you're sizing an accumulation run, then size it from the downstream unavailability and the arrival rate you carried in, not from the space on the floor, and add margin for the wave you haven't seen yet. Tradeoff: the honest number can come out longer than the layout wants it to be. Verify: ask what happens on the worst wave release, not the average minute. If the buffer only survives the average, it isn't a buffer. It's a delay waiting to become a stoppage.

PART IV | LESSON 13: ACCUMULATION DESIGN
COMMON MISTAKE

Leaving the release mode at default and hoping. Singulated, one at a time, is right for plenty of places and completely wrong for a sorter induction that needs product in bursts. The default is a starting point, not a decision. Confirm what the downstream equipment actually needs before commissioning, because a setting that fits the shipping box rarely fits the application.

PART IV | LESSON 13: ACCUMULATION DESIGN
STOP AND THINK

A three-zone accumulation conveyor feeds a labeler that cycles every eight seconds, and during a wave product arrives faster than the labeler can take it. Zone three sits right at the labeler; zone one is farthest upstream. Ask yourself three things, no calculator. What does zone two do when zone three is full? What does zone three do when zones one and two are both full behind it? And if that wave lasts a full minute instead of a few seconds, how many zones would you actually have needed?

PART IV | LESSON 13: ACCUMULATION DESIGN
FIELD INSIGHT | MICHAEL COLLINS

When you get to the end of an EZ conveyor and it's feeding something that isn't an EZ conveyor, that last zone has to be able to talk to the PLC. The PLC needs to tell it to hold, and it needs to know when a package is sitting there waiting. Map those points during design, on paper, before the panel gets built. Every end-of-conveyor zone. Every zone that needs a commanded hold. Every zone that hands off to a piece of equipment that doesn't speak the same language. Miss one and you find it at commissioning, and now you're modifying a panel at the worst possible time to be modifying anything. It's a small component with an outsized impact, and it's the easiest thing in the whole system to look right past.

Michael Collins
PART IV | LESSON 13: ACCUMULATION DESIGN
CONTROLS CORNER

The zone controllers you met last lesson run the accumulation on their own, no PLC touching every zone. The release modes and the handoffs are where the controls system reaches in. Singulate, slug, and cascade aren't three conveyors. They're three configurations of the same zone controllers, and choosing among them is a controls decision you make at design time, not a hardware swap you make later. The bridge between the self-contained EZ world and the PLC-controlled world is the Aux I/O module: it lets the PLC command a specific zone to hold or release, and it lets that zone report whether a package is present. And the release signal carries that fail-safe direction, because a signal that goes missing can mean an uncontrolled release. How it all gets wired, mapped, and made fail-safe is Part V, Lesson 20. Here, you know where it goes and why.

Next: What happens to the package when the system has to turn, climb, or drop?