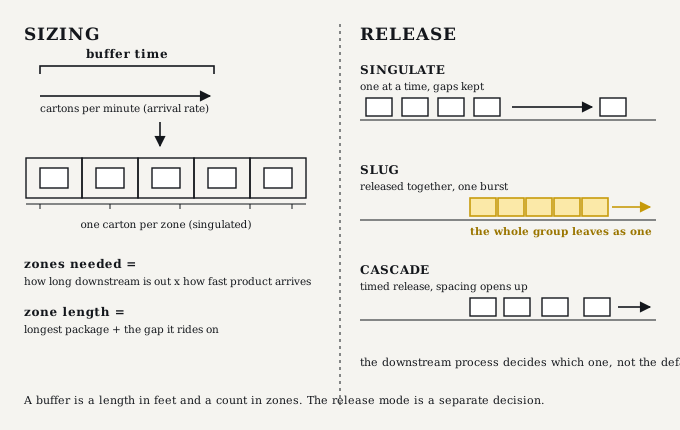
You've decided a point in the system needs to hold product. Good. That's a call, not a design. Saying "we need accumulation here" gives the drawing nothing it can build from. The real question sits underneath it: how long might the process downstream not be ready, and how much product piles up behind it while it waits?
Every buffer in a building is that question wearing a specific number. A labeler that cycles every eight seconds. A sorter induction that pauses while a wave clears. A pack station where somebody steps away for a minute. Each one defines a buffer, and a buffer has a length in feet and a count in zones. Accumulation design is where "we need a buffer" turns into "we need eleven zones at thirty inches each," and where how the product lets go stops being an afterthought and becomes a decision you make on purpose.
By the end of this lesson you should be able to turn a required buffer into a real zone count and zone length, choose the release mode the downstream process actually needs instead of trusting the default, reason about back pressure and what a zone does when everything ahead of it is full, and know conceptually where the PLC has to reach into the zones and why the fail-safe direction of that signal matters.
A zone running in singulated mode holds one package. So the count you're after is simple to reason about: how many packages can show up while the process downstream can't take them? That's the buffer time multiplied by the rate product arrives. If cartons come in at twenty a minute and the process ahead can go unavailable for thirty seconds, that's about ten cartons stacking up, so you need about ten zones to hold them without pressure. Add margin for the wave you haven't watched yet, and there's your zone count.
Zone length comes from the package, not the floor. A zone has to be at least as long as your longest package plus the gap it rides on, which is why both ends of the envelope matter here. The longest case sets how short a zone can be, and you check the shortest so a zone tuned for the big carton still senses the small one. Multiply zone count by zone length and you've got the run length for the drawing. None of this is a magic formula. It's arithmetic off two numbers you already own, the arrival rate and the envelope. The precise gap-and-pitch pass comes in Lesson 25; here you're sizing the buffer, not final-engineering it.
One more gate before you commit to motor-driven roller. In the transportation-versus-accumulation call you checked weight per foot. Accumulation asks a harder version of that question, because a zone holding product carries the full weight stacked in it, and a loaded run carries every zone at once. Motor-driven roller has a rated load per zone it can't exceed. Run the heaviest case you expect to accumulate against that rating. If the load in a zone, or across the packed run, goes past what the MDR is rated to drive, MDR is out at that point, even though it passed the weight-per-foot check one lesson ago. Treat that as a design gate you clear now. The per-zone load arithmetic gets its precision pass in Lesson 25; the gate belongs right here, before the mechanism is locked.
If you're sizing an accumulation run, then size it from the downstream unavailability and the arrival rate you carried in, not from the space on the floor, and add margin for the wave you haven't seen yet. Tradeoff: the honest number can come out longer than the layout wants it to be. Verify: ask what happens on the worst wave release, not the average minute. If the buffer only survives the average, it isn't a buffer. It's a delay waiting to become a stoppage.
Sizing tells you how much buffer. Release tells you how it lets go, and the default is only sometimes the answer. Out of the box, an electric zero-pressure line runs singulated accumulation: one package per zone, and each zone releases the moment the zone downstream of it clears. If the zone ahead is already empty when a package rolls in, the package doesn't even stop, it rides straight through. For plenty of applications that behavior is right. For others it's wrong, and the conveyor has no way of knowing which case it's in. That call is yours.
Slug release changes the rule. Instead of one zone letting go at a time, all the accumulated zones release together as a single group. You reach for it when the thing downstream wants product presented in a controlled burst rather than a trickle, a sorter induction being the classic case. Cascade release does the same job with a timed delay between zones, so the group leaves with a little more space built into it. On a pneumatic system that timed release also softens the shock load the belt takes when a full run cuts loose at once.
The discipline is the same every time. Decide the release behavior each section needs while you're still designing it, by asking what the downstream equipment actually requires, then configure to that answer. Leave it on default and hope, and a sorter induction that needed a slug will underperform on one-at-a-time release, no matter how cleanly you sized the zones behind it. The release names here are Hytrol's; every other manufacturer ships the identical categories under its own labels. Category first, naming second. How each mode gets programmed into the zone controller, the timing values and the logic, is controls work that lands in Lesson 20. Here you pick the behavior; the wiring of it comes later.
Leaving the release mode at default and hoping. Singulated, one at a time, is right for plenty of places and completely wrong for a sorter induction that needs product in bursts. The default is a starting point, not a decision. Confirm what the downstream equipment actually needs before commissioning, because a setting that fits the shipping box rarely fits the application.
A three-zone accumulation conveyor feeds a labeler that cycles every eight seconds, and during a wave product arrives faster than the labeler can take it. Zone three sits right at the labeler; zone one is farthest upstream. Ask yourself three things, no calculator. What does zone two do when zone three is full? What does zone three do when zones one and two are both full behind it? And if that wave lasts a full minute instead of a few seconds, how many zones would you actually have needed?
Two ideas here separate the engineer who specs a conveyor from the one who specs a system. The first is back pressure. Zero-pressure accumulation is supposed to mean packages hold their zones without pushing on the package ahead. In practice, not everything sold as ZPA truly holds zero force. Some designs let cartons make light contact by design, and that constant touch can nudge product forward through a zone it should have held. So the design question is never just "does it accumulate." It's "what's the failure case if a package gets pushed out of its zone." Onto the next conveyor, into the carton ahead, and then what? Answer that before you trust the words zero-pressure on a cut sheet.
The second idea is the direction of the release signal, and this one's a safety decision wearing a controls costume. A zone's release can be set up two opposite ways. Signal-to-stop means the signal tells the zone to hold. Signal-to-release means the signal tells it to let go, which sounds like the same thing backwards until you ask what happens when the signal goes away. Wire a zone signal-to-stop, then drop the signal, say an Aux I/O module gets knocked loose, and with nothing left commanding the hold, the conveyor releases everything it was holding at once, uncontrolled. Set it up signal-to-release instead and a lost signal leaves the zone holding, not dumping. That uncontrolled dump can pile product up fast enough to damage it or hurt whoever's at the discharge. Which way the fail-safe points is a real decision with real consequences, and this lesson's job is to make you see that the direction exists and matters. Wiring it safely, and how the line behaves on a lost signal or a jammed lane, is machine-controls work that lands in Lesson 20 and Lesson 23. Name it now; build it there.
When you get to the end of an EZ conveyor and it's feeding something that isn't an EZ conveyor, that last zone has to be able to talk to the PLC. The PLC needs to tell it to hold, and it needs to know when a package is sitting there waiting. Map those points during design, on paper, before the panel gets built. Every end-of-conveyor zone. Every zone that needs a commanded hold. Every zone that hands off to a piece of equipment that doesn't speak the same language. Miss one and you find it at commissioning, and now you're modifying a panel at the worst possible time to be modifying anything. It's a small component with an outsized impact, and it's the easiest thing in the whole system to look right past.

Time to size Riverside's pre-sorter buffer. You already know product runs at a design target of 20 CPM, and you have the four-product envelope from the requirements work. The Standard Case is the design driver at seventy-eight percent of volume. The Large Case is the biggest at twenty-two inches and twenty-eight pounds. The Tall Case runs eighteen pounds. Upstream of the merge, and again as staging just before the sorter induction, product has to wait whenever the sorter can't take it.
Work the buffer into a plan. From the wave the induction has to ride through and the 20 CPM arrival rate, reason an approximate zone count. From the envelope's longest case, reason a zone length. Then decide how the induction wants that product handed to it, one carton at a time or in a controlled group, and say why. Last, run the accumulated weight in a loaded zone against a motor-driven-roller rating, using the heaviest case you'd expect to stack, and record whether MDR survives that gate or gets ruled out.
Write the accumulation zone plan into your Riverside note: approximate zone count, zone length, the release mode the induction needs, and the weight-per-zone result. Don't design the merge itself, don't pick the sorter, and don't chase the final gap math. Those come later. Today you size the buffer and choose how it lets go.
This is Lesson 13, and it's the first place in Part IV where a requirement becomes a dimension. Everything you carried in, the flow, the rate targets, the envelope, the transportation-versus-accumulation call, converges here into a number the steel has to be built to. Keep the driving question in front of you: how much accumulation does this buffer need, and how should it release? Answer the first half with arithmetic off the rate and the envelope. Answer the second half by asking the machine downstream what it needs, never by trusting the setting the conveyor shipped with. Size it honestly and pick the release on purpose, and the run you draw holds up on the worst wave, not just the average minute.
The zone controllers you met last lesson run the accumulation on their own, no PLC touching every zone. The release modes and the handoffs are where the controls system reaches in. Singulate, slug, and cascade aren't three conveyors. They're three configurations of the same zone controllers, and choosing among them is a controls decision you make at design time, not a hardware swap you make later. The bridge between the self-contained EZ world and the PLC-controlled world is the Aux I/O module: it lets the PLC command a specific zone to hold or release, and it lets that zone report whether a package is present. Conceptually, an Aux I/O goes anywhere the PLC has to speak to a zone or listen to one, every end-of-conveyor handoff, every commanded hold, every merge entry. And the release signal carries that fail-safe direction, because a signal that goes missing can mean an uncontrolled release. How it all gets wired, mapped, and made fail-safe is Part V, Lesson 20. Here, you know where it goes and why.