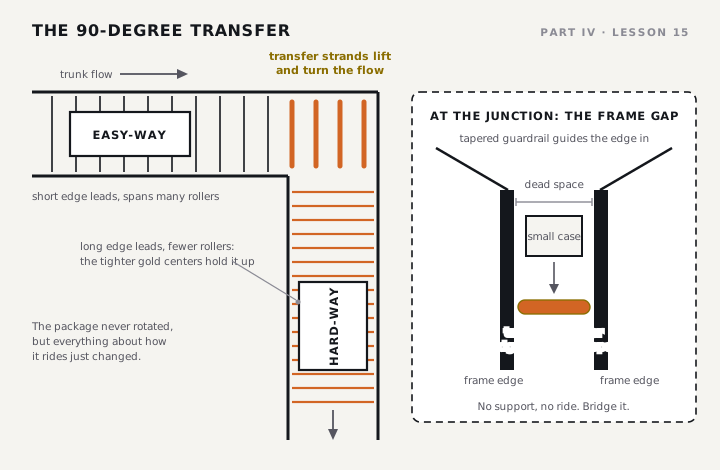
A ninety-degree transfer diverts a package off the trunk line at a right angle. Watch one happen and you'll swear the package turned. It didn't. It rode down the trunk easy-way, short edge leading, long dimension spanning plenty of rollers, steady. Strands came up between the trunk rollers, shoved it sideways onto the takeaway, and let it go. The package is the same way around it always was. Nothing about it rotated.
But the takeaway runs the other direction, so now its long edge leads and only the short dimension lies down the takeaway. It's riding hard-way, and it never turned to get there. That's the move new engineers miss, because they watch the conveyor instead of the package. The transfer is where the easy-way and hard-way idea from Part II stops being a concept and becomes a roller center you either got right or you didn't.
By the end of this lesson you should be able to see that a package that rode easy-way down the trunk is now traveling hard-way on the takeaway, and size the roller centers for the orientation it's actually in, bridge the frame gap so small product doesn't hang up in the dead space, design clearance that absorbs the stopping drift the system develops as it ages instead of chasing a perfect delay, and know why you never feed air-based accumulation straight into a merge.
I've been riding easy-way down the trunk, my short edge leading, plenty of rollers under me, steady. Now strands come up between the rollers and shove me sideways off the line. I didn't spin. I'm the same way around I always was, but the takeaway runs the other direction, so now my long edge is leading and there are barely enough rollers under me. Is the spacing tight enough to hold me up hard-way, or am I about to teeter? There's a gap where these two frames meet, am I going to bridge it or drop a corner into it? Is the guardrail tapered to guide my leading edge in, or is it going to catch me and spin me?
Three things all have to be designed at a ninety-degree transfer, and the package tests every one on its way across. The first is strand spacing. The strands pop up between the trunk rollers to lift the package and redirect it, and they're spaced across the width the same way roller centers are spaced along the length. The same rule applies: the package needs enough strands under it through the whole divert, or it rocks, tips, or misaligns. A package that's too small or too flexible for the strand spacing fails the divert.
The second is the takeaway roller centers, and this is where the orientation change bites. Because the package is now hard-way, you size the takeaway centers from the short dimension it's actually riding on, not the long dimension it rode on the trunk. Take a 15 by 8 carton. Easy-way on the trunk, the 15-inch side spans plenty of 3-inch centers and it rides fine. Divert it, and now the 8-inch side is in the direction of travel. With only 8 inches spanning the rollers, 3-inch centers don't keep enough rollers under it, and it teeters and dips between them. The takeaway may need 2-inch centers to hold it up. Carry the trunk's centers onto the takeaway and you've built a conveyor that can't support the package in the orientation it'll actually be in.
The third is the frame gap. Butt two standard conveyors side by side and there's a real gap between their frame edges. Two 24-inch OAW (overall outside width) units touching are 21 inches between-frame each, so roughly 3 inches of combined side frame sits between them. A small package crossing that gap hard-way is likely to catch or hang up in the dead space. You bridge it: spread the conveyors slightly and drop in a transition roller across the gap so the package has a supported surface to cross, and taper the guardrail entering the takeaway so it guides the leading edge in instead of catching it.
One thing this transfer doesn't include yet is the arithmetic. How far the package travels laterally during the divert, the cycle time that takes, and the minimum gap the trunk line has to hold so the next package doesn't arrive mid-divert: that's the transfer collision-gap math, and it's the work of Lesson 25, where the Calc Logic Guide is the authority. Here you design the physical transfer, the strands, the hard-way centers, the bridged gap. Lesson 25 runs the numbers on it.
If you're designing any transition between two butted conveyors, then measure the combined frame gap and compare it to the smallest product crossing it hard-way before you finalize anything. Tradeoff: spreading the conveyors and adding a transition roller costs a little length and a part. Verify: picture the smallest package crossing that gap hard-way, long edge leading, so only its short dimension spans the dead space. If you can see it dropping a corner into the dead space, you need the transition roller. Don't wait for commissioning to find out the gap wasn't acceptable.
Stopping a package precisely over the strands is as much a controls problem as a mechanical one, and the design answer isn't a better delay. The photoeye can't sit over the strands, because a diverting package would strike and damage it, so it goes upstream, clear of the divert motion. Since the sensor is offset from the strands, the PLC can't stop the package the instant it's seen. It waits a calculated delay, based on belt speed, while the package travels from the sensor to the strands, then stops it.
That delay is reliable on day one and less reliable a year in. The O-ring drives many roller conveyors use stretch, dry out, and lose elasticity as they age. As they degrade, slippage climbs, the package travels a little less per unit time than it did at commissioning, and the stopping position drifts, short or long. The delay that put the package dead-center over the strands when the system was new stops it off the mark once the O-rings have aged.
The correct response isn't a tighter delay calculation, which is only right when conditions are ideal. It's clearance-by-design. Size the takeaway opening so the longest carton in the mix clears both side frames even when the stop position varies across the expected range. Tapered guardrails, with the rollers set high at the entry, absorb small variations, but only small ones. Too steep a taper forces the package to rotate or bind, so the takeaway still has to be sized for the material it handles.
Trying to solve stopping drift with a tighter delay. O-rings degrade, air pressure varies, product weight varies, and the stop position moves over the life of the system no matter how good the day-one delay was. The fix isn't a delay that's only correct when everything's ideal. It's clearance: size the takeaway so the longest carton clears both frames even as the stop position drifts. You design that in from the start, or you change the takeaway geometry later.
The delay itself is a real number, set at commissioning for the belt speed and revisited as the system ages. How it's programmed and tuned is machine-controls work, and that's Lesson 20 in Part V. The gap math the clearance has to satisfy is Lesson 25. For now, know that the delay drifts and that clearance, not precision, is what absorbs the drift.
A merge combines two or more flows into one, and every merge is a potential jam point, because product from several lanes gets forced into a single path. There are three physical configurations.
One control principle governs all three. The PLC releases one lane at a time in a sequenced pattern so product zippers into single file instead of colliding at the merge point, and that controlled release is the entire basis of merge reliability. Anything that wrecks the PLC's ability to release and stop product precisely wrecks the merge.
Which is the one hard rule: never feed air-based accumulation directly into a merge. Air is fickle. Leaks, low pressure, high pressure, moisture in the line, all of it makes air components sluggish or makes them fail, and all of it changes the reaction time when the PLC says stop. Put a belted conveyor section at the end of the air accumulator, upstream of the merge, so you've got positive control of the package before it enters. And treat the merge like the throughput constraint it really is, not a free directional transition.
Three lanes of air-based accumulation feed a merge, and it jams two or three times a shift during wave releases, with no mechanical problem anyone can find. Before you touch the PLC parameters, ask two things. What's feeding the merge, and what does air do to the reaction time the PLC is counting on? Then ask where you'd put positive control back into the picture.
When you merge product together there's a high potential for a jam, so we use the PLC to release one lane at a time, and the product zippers into single file. Because that control is critical, it's bad practice to feed a merge directly with any conveyor that uses air. Air is fickle. Leaks, low pressure, high pressure, moisture in the line, all of it makes the air components sluggish or makes them fail, and all of it changes the reaction time when the PLC tells the conveyor to stop. When you've got air-based accumulation feeding a merge, put a belted conveyor at the end of that accumulator, upstream of the merge, so you have positive control of the package before it enters. And know the limits of your controls team. They may need a little extra gap to give you the robustness you want. The merge is highly PLC-controlled, so the gaps, the delays, and the lane-switching timing all have to be in your capacity calculations. The merge is not free throughput.

There's a number hiding in that last line. Every lane switch costs dead time in the merged stream, so the merge hands the sorter less throughput than the sum of its lanes. Putting a figure on that penalty, the merge dead-time and lane-switch method, is Lesson 25. Here, know the merge isn't free throughput and why. And the sorter it feeds, the machine that reads each carton and sends it to a door, is Lesson 16.
Back to Riverside. Dana walked you through where the product comes from.
"Our picking operation is split across two zones. Zone A is on the second floor. That is where we handle apparel and housewares. Zone B is on the ground floor in the northeast quadrant. That is packaged food products. Both zones use pick-to-light systems at static shelving. Pickers fill orders and put them on carts. The carts get walked to the staging area near the dock doors on the south wall."
Zone A's flow comes down the mezzanine decline you designed in Lesson 14. Zone B's runs along the ground floor. The two have to become one stream before the sort to the three doors. And you already know what almost sank this building the first time around. Michael told you.
"First one was a pneumatic accumulation system. Worked fine for about four months. Then the compressor started having issues. Air pressure would drop during peak volume and the zones would stop releasing cleanly."
Name the merge type that brings Zone A and Zone B together before the sorter, and say what's feeding it from each side and what that means for the accumulation upstream. Address the air-feed risk out loud, with Michael's first system in mind. Then take the transfer side: a Standard Case or a Small Case diverting to a dock-door takeaway is riding hard-way. Recompute the takeaway roller centers from the hard-way dimension, and check the frame gap against the Small Case, 8 by 6 by 4, the one small enough to hang up. Don't run the merge dead-time or the transfer cycle math yet, and don't pick the sorter. Write the merge configuration and the transfer note into your Riverside file.
This is Lesson 15 of thirty-five, and it sits on the two highest-complexity handling moves short of the sorter: the point where product changes direction, and the point where flows become one. Everything you carried in gets tested here. The easy-way and hard-way call from Part II decides your takeaway centers. The accumulation you sized in Lesson 13 is what feeds the merge, and whether it's belted or air-based decides whether the merge holds. The curves and declines from Lesson 14 are the geometry that delivers the package to the transfer in the first place. Get the orientation change and the air-feed rule right, and you hand the sorter a clean, single-file stream. Miss either one and you hand it a jam. Keep the package in front of you, not the conveyor, and both moves come clear.
Two control realities meet in this lesson. At the transfer, the photoeye sits upstream of the strands, so the PLC can't stop the package the instant it's seen. It waits a calculated delay while the package travels from the sensor to the strands, then stops it. That delay is a real number tied to belt speed, set at commissioning and revisited as the system ages and slippage creeps in, which is exactly why clearance, not a perfect delay, is the durable fix. At the merge, the control reality is the zipper: the PLC releases one lane at a time in a timed sequence so the lanes interleave into single file instead of colliding, and that release logic is the whole basis of the merge working. Both are PLC parameters that end up on the installation drawing, and both are why an air-based feed, whose reaction time you can't trust, breaks a merge that depends on precise release. How the delay and the release sequence get programmed and tuned is Part V, Lesson 20. For now, know that a transfer and a merge are as much controls design as they are steel.