A running system starts sending a slice of its cartons to the wrong doors. Not all of them, just enough to matter. The controls contractor pulls up the PLC logic and swears it's clean: the divert fires exactly when it's told. The mechanical team watches the sorter all afternoon and shows you it firing right on time. The customer's IT says the WMS is sending correct routing, with the logs to prove it. Three teams, each certain the problem isn't theirs, and the misdirects keep going out the door.
None of them are lying. The reason it stays broken is that nobody has named which layer owns the problem, so it keeps getting handed to the wrong one. A carton going to the wrong door isn't one kind of failure. It's four or five different failures that look identical from the dock, and each one lives on a different layer of the system. Before you can fix a controls problem, you have to locate it in a stack of five layers. That's what this lesson gives you.
By the end of this lesson you should be able to draw the five-layer controls topology from memory and say what each layer does and who owns it, tell a WCS from a WES by the decisions it makes and not just its name, and take any controls problem on a live system and say which layer owns it before you send it to a team.
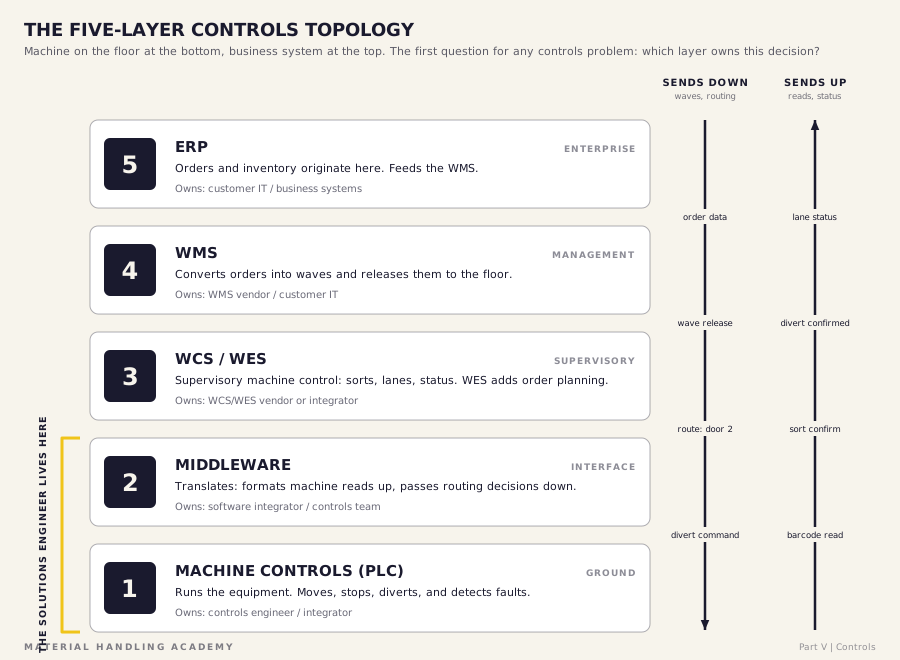
Every controls conversation you'll have on a project runs on one mental model, and this is it. Five layers, stacked from the machine on the floor up to the business system in the back office. Instructions move down, status moves up. Get these five into your head and you can place any person, system, or problem exactly where it belongs. Here's the whole thing on one page.
Walk it from the ground up. The layer number is the order you'll draw it in for the rest of your career.
Now the part that matters for you specifically. You have to understand all five well enough to hold an intelligent conversation with every person on the project, from the PLC programmer to the WMS administrator to the customer's IT director. Nobody's an expert at all five, and you don't need to be. But your working knowledge runs deepest at Layers 1 and 2, where the conveyor you designed connects to the machine controls and the data-exchange interface. That's your home, and that's why the gold bracket on the diagram sits exactly there.
Two things live inside those bottom layers that this lesson names but doesn't open. What actually moves across that Layer 2 interface, and how fast it has to arrive, is the data-exchange conversation, the deep work of Lesson 22. The machine-execution detail inside Layer 1, the PLC logic, the drives, the driver cards, is Lesson 20. For now you're learning the five layers and who owns each. The depth inside each is the rest of Part V.
If you're walking into a controls problem on a live system, then before you dispatch anyone, draw the five layers on whatever's nearby and ask one question at each: is the read good, is the translation good, is the destination returned correct, is the wave current. Tradeoff: it feels slow when everyone in the room wants you to just go look at the sorter. Verify: the layer where your questions stop getting clean answers is the layer that owns the problem. You'll have saved a day of the wrong team looking in the wrong place.
The two acronyms look like siblings and get used like synonyms. They aren't the same thing, and the difference isn't trivia. A WCS, a Warehouse Control System, gives supervisory control of the machines. It takes the routing intent handed down to it and turns it into sort decisions, lane assignments, and system status. That's its whole job: run the machines well and report what they're doing.
A WES, a Warehouse Execution System, is a WCS that also does order-side work. Order planning, batching, and the logic of how product should move to fill orders. The boundary between the two is order intelligence. A WCS routes what the WMS tells it to route. A WES decides some of the order sequencing itself, work that would otherwise live up in the WMS.
Make it concrete. "Divert carton 123 to lane 5" is a WCS decision either way, because that's supervisory machine control and both systems do it. "Group these forty orders into a batch and sequence them to balance the pick faces" is order intelligence. If the execution layer decides it, you've got a WES doing WES work. If the WMS decides it and hands the result down, you've got a plain WCS underneath. Same box on the floor, different line of responsibility.
Here's the trap in the naming. On plenty of projects the same vendor's same product ships as either one, depending on which modules the customer turned on. The letters on the box don't settle it. Ask what the system decides, not what it's called.
Treating WCS and WES as interchangeable because the acronyms look alike. They're not the same layer of responsibility. A WES makes order-side decisions a WCS never touches. Spec a plain WCS into an operation that needed order execution and you've left a whole layer of decisions with no owner, and the customer finds out during the first peak.
Here's the payoff. Once the five layers are in your head, you can take any decision on the system and say which layer owns it. That's the skill this whole lesson is building toward, because locating a decision is the first move in fixing anything that goes wrong with it. Start with these.
| The decision | Layer that owns it |
|---|---|
| Release this wave to the floor | WMS, Layer 4 |
| Sequence these orders into batches | WES if present, else WMS, Layer 3 or 4 |
| Divert this carton to lane 5 | WCS decides, Layer 3; PLC executes, Layer 1 |
| Stop this zone, it's jammed | PLC, local logic, Layer 1 |
| Which carrier does this order ship | Originates in ERP, Layer 5; carried by WMS, Layer 4 |
| Format the machine's read so the WMS can use it | Middleware, Layer 2 |
The rule under all of it: when something breaks, your first move isn't to guess at a fix. It's to name the layer that owns the decision that went wrong. Go back to the misdirect from the top of this lesson. A carton at the wrong door could be a bad read at Layer 1, a bad translation at Layer 2, a wrong destination returned at Layer 3, or a stale wave at Layer 4. Four different layers, four different owners, one identical symptom. You don't fix it until you've located it.
There's a companion skill to this one: the method for deciding who should own a brand-new decision point you're designing from scratch. That's a different move, and it's the work of Lesson 22. Here you're locating decisions that already exist in the stack, not designing new ones.
Here are three things that just happened on a live system. A carton went to the wrong door. A whole wave never released. A zone stopped and won't restart. For each one, name the layer you'd question first and the layer you'd question last. If two of your answers land on the same layer, ask yourself whether you're actually locating the problem or just guessing the machine because the symptom is mechanical.
You don't have to be an expert at every layer. Nobody is. But you have to understand all five well enough to talk intelligently to every person on the project, from the PLC programmer to the WMS administrator to the customer's IT director. And when something breaks, the first question is never what's wrong. It's which layer owns this. A machine problem that's really a data problem, sent to the machine team, just wastes a day and comes back. Locate it first. That habit alone will make you the person they call when the system's down and nobody knows why.

Back to Riverside. Remember Ray, the IT Systems Administrator you met in discovery. He's the owner of Layers 4 and 5, the WMS and the ERP behind it. Here's how he described the WMS in that first meeting:
"We run a standard WMS. It manages all picking, inventory, and order release. When an order wave goes out the WMS knows which carrier each carton is going to. That information is tied to the barcode on each carton."
Now place every piece of Riverside on the five layers. The EZLogic accumulation logic and the zone controllers sit at Layer 1. The PLC that fires the divert is Layer 1. The middleware that carries the scan up and the routing back down is Layer 2. The decision of which door a barcode is going to is a Layer 3 WCS decision. The WMS that ties carrier to barcode, the one Ray runs, is Layer 4. The ERP behind it is Layer 5.
Draw the five-layer stack in your Riverside note and write each component on its layer, with the owner named next to it. Then flag the one open item still sitting on this architecture: the WMS response-time number Ray gave you, half a second, which he flagged himself as unconfirmed. It lives at the boundary between Layer 2 and Layer 3, and this controls architecture can't be finalized until Ray confirms it. Don't run the math on it yet. Just mark it, date it, and keep it where you'll find it again. This is the first page of the controls architecture summary you'll build across Part V.
This is Lesson 18, the front door of Part V, and the whole part hangs on the diagram you just learned. Sensing, machine controls, power and networks, the data handshake, recovery: every lesson from here on is depth inside one of these five layers. When you're deep in the timing of a divert or the payload of a message and you've lost the thread, come back to the stack and ask the question that started this lesson: which layer owns this decision? Locate it first, and everything else is detail once you know where you're standing.