PART V | LESSON 22: DATA AND DECISIONSMATERIAL HANDLING ACADEMY
DRIVING QUESTIONWhat has to move between systems, how fast, and what happens when it doesn't arrive?
THE EMAIL THAT CHANGES THE DESIGN
You've been designing to a number nobody confirmed. Back in discovery you asked Ray, Riverside's IT systems administrator, how fast the WMS could answer a routing query. He gave you one off the top of his head, half a second, and he flagged it himself as a guess. You logged it as an open item and kept building on the placeholder. Then this lands in your inbox.
EMAIL | RAY, IT SYSTEMS ADMINISTRATOR
"Hey. Checked with our IT manager on the WMS response time question. The half second I mentioned in the meeting was best case on a normal day. Under peak load conditions the guaranteed response time is one second. That is what you should design to. Sorry I did not have the right number in the room. Let me know if you have other questions."
The number doubled. And because response time is a physical constraint and not a software setting, a lot of the design that hung off the half-second moved with it. This lesson is why that email matters, and what you do the day you get one.
By the end of this lesson you should be able to ask the three data questions at any decision point, walk the three-part handshake and name every way each part can fail, write an interface contract with payloads, timeouts, and retries, treat response time as the physical constraint it is, and build a latency budget worksheet and an interface map for a real sort point.
The three data questions
At every smart decision point in a system, before you draw a line of the physical layout, three questions get answered. Not at detailed design. During the flow diagram phase, because the answers decide where the steel goes. You met these three back in Part III, on the flow diagram. Here they get taught in full, because Part V is where the answers turn into hardware.
What information is needed here to make the correct decision? A barcode, a weight, a destination code, an order status.
Where does that information come from? Embedded in the barcode and readable right at the machine, or a lookup from a higher-level system through middleware.
Who makes the decision? The PLC on its own local logic, or a request up to the WCS or WMS and a wait for the answer.
The order matters. A decision point that needs a lookup needs a scan point, a middleware connection, and a response-time budget that reaches back into the belt speed and the gap. A decision point the PLC can settle on its own needs none of that. And that second case is a real answer, not a dodge. If local logic resolves the point, none of this machinery applies, and naming that early keeps you from building an interface where there's no question to ask. The calculators that set belt speed and gap were Part III and come back in Part VI; here those numbers are inputs to the timing, not outputs to derive.
Information flow is not product flow
Information flow is a separate thing from product flow. The carton moves down the belt, and that's product flow. The barcode read, the routing query, and the routing answer move across the network, and that's information flow. Routing logic is the decision that assigns the destination. The whole trick of a smart decision point is getting the information flow to finish before the product flow arrives at the divert. Two races run at once, and the data has to win.
FIELD INSIGHT | MICHAEL COLLINS
The controls conversation with the customer does not focus around machine level controls. It focuses around data acquisition at each smart point in the system. What information needs to be exchanged between the system controlling the automation and the systems of the house. That is fundamentally where a solutions engineer wants to live: what information needs to be ascertained from who, at what location, so we can make the decisions in our automation. The rest of the details are very important but typically not important during the beginning stages of the design. However, if the customer is talking about wanting to do inline weighing, a print and apply system, or intelligent diverting, we do want to talk about what the decision hierarchy looks like, what decisions are being made, and who is making them. But this should be figured out in the beginning planning phases with the flow diagram. By the time you get to detailed design, it is too late.
The three-part handshake
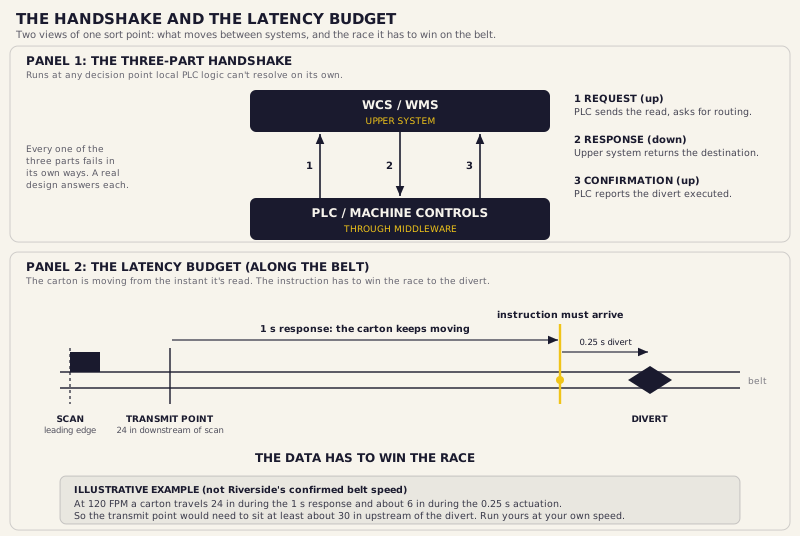
When local logic can't resolve a point, a three-part handshake runs between the machine layer and the upper system. Request, response, confirmation. Each part carries a job, and each part fails in its own specific ways. A real design has an answer for every one of them.
The three-part data handshake, and where each part fails
Part
Direction
What happens
Where it fails
1. Request
Machine to upper system
The PLC reads the identification and sends it up through middleware with a request for routing.
No-read: the barcode's unreadable. Timeout: no answer comes back inside the window.
2. Response
Upper system to machine
The WCS or WMS looks up the item, picks the destination, and returns the routing instruction.
Wrong destination returned: the item's diverted to the wrong place. Delayed response: the item's already past the point, sort missed.
3. Confirmation
Machine to upper system
The PLC executes the divert and reports back that the item reached its assigned destination.
No confirmation sent: the upper system doesn't know it landed, inventory accuracy slips. False confirmation: the item jammed but the record says success.
Naming the failure is what lets you design the response. Every entry in that right-hand column is a field problem waiting for its day if nothing downstream is built to catch it. What the system does when each one fires, where a no-read goes, how a timeout gets handled, what recovers a lost track, is the exception routing, and that's Lesson 23. This lesson builds the taxonomy. The next one designs the answer to each line of it.
One sort point, two views. What moves between the systems, and the race the answer has to win before the carton reaches the divert.
Latency is physical, not software
The item is moving from the instant it's read. The routing instruction has to reach the PLC before the item reaches the divert. The distance between the scan point and the divert, divided by the belt speed, sets the longest response time the system can tolerate. If the upper system can't answer inside that window, the design has to change, and the levers are physical: more distance between the scan and the divert, a slower belt, or a bigger gap. That's why a number going from half a second to a full second is a design event and not a config change. The response time is owned by the controls team and the mechanical team together.
WHYThe item's moving from the moment it's read. If the answer arrives after it's past the divert, the sort's missed, no matter how good the software is. It's a distance-and-speed problem wearing a software costume.
WHENDuring the flow diagram phase, while belt speeds and gaps are being set, and re-checked the instant the number changes. Not when: Don't file the response time under software and assume they'll handle it. It sets the distance between your scan point and your divert and it can set your belt speed. It's a physical requirement you own jointly with the controls team, not a setting someone tunes later.
WHEREAt every sort point that depends on a lookup, and in the interface contract with whoever owns the upper system.
FAILURE IF IGNOREDYou design the scan-to-divert distance around a number nobody confirmed, the real response time comes in slower under peak, and the instruction shows up after the carton's already past the divert. The sort misses on exactly the shifts that matter most, and now the fix is moving hardware instead of changing a line in a spec.
The interface contract
Two systems that talk to each other need agreed terms, and that agreement is the interface contract. It has four parts. The payload: which fields move in each direction. The timeout: how long the PLC waits before it gives up. The retry rule: try again, or fail to the exception path. And the failure behavior: what the system does when the answer doesn't come. An API is the defined interface those messages travel through, and they ride the same plant Ethernet you segmented in Lesson 21, as ordinary TCP/IP traffic. Don't confuse that with EtherNet/IP: that's the ODVA protocol your devices speak on the machine network. Same wire discipline, different layer, different conversation. Write the contract down, because a handshake nobody wrote terms for is one two teams remember differently, and they find out which way at commissioning.
Keeping the numbers honest
The confirmation step is where the numbers either stay honest or quietly rot, so it's where data governance lives. Three pieces hold it together. An event ID on every transaction, so a single message can be tracked end to end. Idempotency, so the same message processed twice doesn't double-divert a carton or double-count inventory. And reconciliation, so the controls and the WMS periodically compare notes on what actually happened against what each one thinks happened. Skip governance and the confirmation step turns into a story each system tells itself, and the inventory count drifts until someone spends a weekend counting cartons by hand.
COMMON MISTAKE
Treating the response time as a software problem only. The window between scan and divert is set by belt speed and distance, and both are physical. If the upper system can't answer in that window, no amount of code speeds up a carton that's already moving. The mechanical layout has to change, and both teams own that number.
STOP AND THINK
Your belt runs at a fixed speed and your scan point sits a fixed distance upstream of the divert. Someone tells you the WMS response time just doubled. Before you touch anything, name every number in your design that just became suspect. If your list has only one item on it, look again, because a response time touches distance, speed, and gap all at once.
PRO TIP | MC
If a sort point depends on a lookup from the WCS or WMS, then calculate the maximum allowable response time for that point from your belt speed and your scan-to-divert distance, and hand that number to the controls team early. Tradeoff: it's a number you have to produce before you feel ready, off speeds that aren't final yet. Verify: ask the upper-system owner, in writing, whether they can guarantee a response inside that window under peak load. If the answer is no, or "probably," you found out during design instead of during commissioning, and the fix is still cheap.
RIVERSIDE PROJECT
Back to Riverside, and the email at the top of this lesson. The confirmed WMS response time is 1 second, not the half-second you'd been carrying. The scan trigger fires at the carton's leading edge. The WMS query is transmitted from a point 24 inches downstream of that trigger. The divert takes 0.25 seconds to actuate.
Run the latency budget on Riverside's one sort point. At your belt speed, how far does the carton travel during the 1-second response, how far during the 0.25-second actuation, and does the transmit-point-to-divert distance cover both? Then build the interface map, and write down what changed the day the number went from 0.5 to 1.0 second. That last step is the job.
Fill in both templates below at your own belt speed. If the transmit-to-divert distance doesn't cover the budget, don't force it. Name the lever you'd pull and say why.
Ray's confirmed number, guaranteed under peak load.
Response distance
V x 1.0 s
How far the carton travels while the upper system answers.
Actuation time
0.25 s
The divert mechanism, from the project data.
Actuation distance
V x 0.25 s
How far the carton travels while the divert fires.
Required transmit-to-divert
response + actuation distance
The minimum distance the layout has to give you.
Actual transmit-to-divert
______ in
Measured on your layout, from the 24 in transmit point to the divert.
Fits?
actual is at least required
If it doesn't, pull one of the levers below.
Levers if it fails
distance / speed / gap
More scan-to-divert distance, a slower belt, or a bigger gap. All three are physical.
Illustrative check at 120 FPM, which is 24 inches per second: response distance 24 in, actuation distance 6 in, so you'd need about 30 in from the transmit point to the divert. That figure shows the method. It isn't Riverside's confirmed belt speed. Run yours at the speed you specified.
Deliverable B: Interface map reusable template
Link
Payload up
Payload down
Timeout
Retry
Failure behavior
PLC to WCS
The barcode read.
The door assignment.
1 s
Your rule.
No answer in the window routes the carton to the hospital lane, the staffed exception spot where a person sorts what the system couldn't.
WCS to WMS
The routing query, keyed to the barcode.
The carrier-to-door instruction.
Inside the 1 s budget.
Your rule.
No destination returned is treated the same as a no-read.
How each failure actually gets handled, the timeout out to the hospital lane, the degraded mode when the WMS is down entirely, is the exception routing, and that's Lesson 23. Here you name the behavior. Next lesson you design it.
FOREST THROUGH THE TREES
This is Lesson 22, the center of the controls part. Everything Part V has built, the topology, the sensing, the machine controls, the power and the networks, exists to carry information between systems so a decision can become a divert at the right instant. Get the data model right and the sort point holds up on the worst shift of the year. Get it wrong and a perfectly good sorter throws cartons at the wrong door. The interface map and the latency budget you just built are two pages of the controls package, and they're why a one-line email from Ray could move steel. Response time is physical. Carry that out of this lesson and the rest is detail.
CHECKPOINT
A scan point sits 15 feet upstream of the first divert and the belt runs at a fixed speed. Explain how you'd find the maximum time the upper system has to return a routing decision before the carton reaches the divert, and what your design options are if the upper system can't answer that fast.
Walk the three-part handshake at a sort point. For each of the three parts, request, response, and confirmation, name one way it can fail and what that failure costs the operation if nothing downstream is designed to catch it.