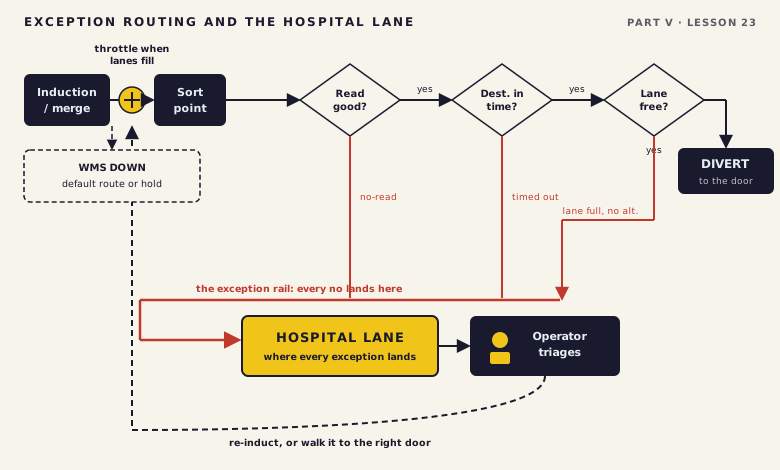
Everything across this part designed the system for the day it works: the scanner reads, the WMS answers in time, the divert fires, the carton lands at the right door. This lesson designs it for the day it doesn't, and that day always comes. A photoeye stays blocked and a zone jams. A lane fills during a wave. A barcode won't read. The WMS drops for ninety seconds at the worst moment. None of those are exotic. They're Tuesday.
What separates a system an operator trusts from one they fight is whether every failure has a designed destination and a designed recovery, or whether it stops the whole line and waits for someone to figure out what happened. Recovery is engineering, not improvisation, and it's the last thing the controls architecture owes the operation. We design the stop and the restart here; the guarding standard behind that e-stop is a Part VI conversation.
By the end of this lesson you should be able to route every failure mode to a destination instead of a dead stop, explain anti-gridlock as both a controls rule and a mechanical runway, size a hospital lane to the exception volume it actually has to clear, design a degraded mode for when the WMS drops, and build an alarm and restart scheme an operator can actually work at 2 AM.
Two runtime conditions the PLC watches on every shift. A jam is detected when a photoeye that should clear inside a defined time window stays blocked past it; the PLC stops that zone and alerts the operator. That response is deliberately blunt, because a jam that keeps feeding is a jam that grows.
A lane-full condition is detected when the photoeye at a sort lane's entry stays blocked, so the lane can't take more product. The carton headed there has nowhere to divert, so the system sends it elsewhere: a backup lane, recirculation on a loop, or the destination of last resort, the hospital lane.
Here's where Lesson 22 comes back. Every entry in the handshake failure taxonomy needs a real destination at runtime, or it stops the line: no-read, lost track, no destination returned in the window, reject criteria failed, lane-full with no alternative, unknown item the WMS doesn't recognize. Each is a carton, moving, that has to go somewhere real in the next second or two. What each mode was, its origin in the handshake, you know from Lesson 22; this lesson is where each one goes. That destination of last resort is the hospital lane, sometimes the jackpot lane: a dedicated sort destination with an operator workstation, where a person triages each exception, finds its destination, and walks the carton there or re-inducts it.
Designing the hospital lane as a placeholder rather than a throughput element. It's easy to draw the exception box at the end of the sorter and move on, because during initial sizing it never seems to matter. Then the no-reads and rejects show up at the rate they always do, the placeholder can't clear them, and it backs up into the sorter and creates a secondary jam that stops everything.
Gridlock is a condition specific to sorters with recirculation, whether a loop sorter's built-in loop or a line sorter's separate recirculation conveyor. It happens when the recirculation path and all the destination lanes are full at the same moment, so product can't divert, can't recirculate, and can't clear. The whole system stops until somebody clears it by hand.
Anti-gridlock control prevents it by correlating induction rate to clearance rate. If the lanes are filling and the loop is loading up, the system throttles or stops new induction before it runs out of path. The PLC watches lane status and loop load continuously. That's the controls half, and it's where most engineers stop.
Here's the half they miss. The PLC can only throttle if the layout gave it enough physical buffer to absorb product while the throttle takes effect. Leave no runway between the induction gate and the loop, and no PLC logic prevents gridlock under heavy load. That buffer is floor space, not code; how much of it, how many zones and what length, was Lesson 13 sizing.
One scope note before Riverside: true loop gridlock needs a loop. A line sorter, which has no closed recirculation loop, can't gridlock the same way. Learn the general loop form, then carry the transferable principle into any sorter, including a line sorter's merge: induction rate must track clearance rate.
The way the controls interact with incoming product on a sorter has to be directly correlated to the rate at which the sorter can get rid of product or divert product. If you are inducting faster than the sorter can clear, you will fill the loop, fill the lanes, and have nowhere for the product to go. That is gridlock. The controls must throttle induction based on what is happening downstream, not just run at maximum speed because product is available upstream. Anti-gridlock is important to understand as it pertains to mechanical design. The physical layout must provide enough lane capacity and recirculation buffer that the controls have time to respond before the system reaches a gridlock state. If the mechanical design does not give the controls enough runway, no amount of PLC logic will prevent gridlock under heavy load conditions.

If you're relying on anti-gridlock logic to protect a recirculating sorter, then make sure the mechanical layout gives the controls enough buffer between the induction gate and the loop to actually absorb product while the throttle takes effect. Tradeoff: that buffer is floor space, and floor space is always contested. Verify: ask what happens under the heaviest load, if every lane fills at once, does the layout give the PLC room to throttle before the loop runs out of path. If the answer's no, the code can't save it. Build the runway into the layout.
The hospital lane is a throughput element, not a placeholder, and it's sized for exception volume, not system volume. Multiply the system throughput by the expected exception rate, the no-read rate plus the reject criteria rate; the lane and its operator have to clear at least that many pieces an hour, or exceptions back up into the sorter and become a second jam that stops the line. The method is one multiplication:
Example only. The percentages below are placeholders to show the method, not measured rates for any real system.
Now the operator, because recovery is something a person does. When the WMS is down, cartons keep arriving and nothing upstream knows it's gone. The system needs a designed behavior for that window: route everything to a default door, send it to the hospital lane, or hold at accumulation until the link's back. Any of those can be right; what can't be right is discovering the answer at runtime. The degraded mode is a design choice, not a crash found in production.
Restart after an e-stop is its own design. A stopped zone doesn't come back on its own, and it shouldn't; that's the reset logic from Lesson 20. It needs a deliberate, located reset and a safe restart sequence so nothing surges back to life while someone's got a hand in the machine clearing the jam. The controls sequence is what we design here; the guarding and lockout compliance around it lands in Part VI.
Two more the operator lives with. Alarm rationalization: when a fault cascades, one root cause can throw fifty symptom alarms, and the operator needs the one naming the cause, not the forty-nine burying it, so the Lesson 20 alarm philosophy has one job at runtime: point the operator at the cause, not the symptoms. And the HMI is where it all meets a human, so it has to move the operator from alarm to cause to fix. Carry one field reflex with it: when an accumulation zone misbehaves, the zone controller and its configuration are the first place to look, not the hardware. A zone that won't release cleanly is far more often a config setting than a failed motor or photoeye, so check the setup before you condemn a component and swap parts you didn't need to. Which failures to expect, the reliability model behind them, is a later analysis; here you design the recovery, not the math that predicts it.
It's 2 AM. A zone's stopped and the HMI is stacked with alarms. You don't want a wall of red; you want one line naming which photoeye stayed blocked and where, so you walk to it, clear it, hit a reset you can find, and watch the zone come back without anything lurching. Design for that person on that shift, not for the demo where nothing goes wrong.
The WMS connection drops for ninety seconds during a peak wave. In that window cartons keep arriving at the sort point and nothing upstream knows the WMS is gone. Name what you'd want the system to do with those cartons, and what you'd have had to decide during design for that behavior to exist. If your answer's "stop the line," ask whether that's a design or just a surrender.
Time to design Riverside's recovery and close the controls architecture. Riverside runs a three-door line sorter, Carrier A to Door 1, Carrier B to Door 2, Door 3 for overflow and returns, at a 20 CPM design target.
Jam, lane-full, exception routing. At the sorter and the three door lanes the response is stop the zone and alert the operator; for a door lane that fills mid-wave, name where the carton goes. Then send every failure mode from your Lesson 22 taxonomy to the hospital lane, including the no-read and the WMS-timeout carton that missed the 1-second window Ray confirmed.
Hospital-lane sizing. Run the exception-volume method at 20 CPM. That's 1,200 cartons an hour, so even a low single-digit exception percentage puts dozens an hour into the hospital lane, and the lane plus its operator have to clear at least that many. The known misdirect rate of about three percent is a real anchor for that conversation, not the same thing as the no-read rate, so frame it honestly and show one clearly-labeled figure.
Anti-gridlock, degraded mode, restart. The line sorter has no closed recirculation loop, so true loop gridlock doesn't apply; throttle induction at the merge when a door lane fills. Decide what Riverside does when the WMS is down, a default-route or a hold. Then the forklift-crossing e-stop needs a deliberate, located reset and a safe restart.
Write the recovery-and-exception plan in your Riverside note. That closes the controls architecture summary, the setpoints list, and the interface map together.
This lesson ends the controls arc. Part V asked one question, how does the system know what to do, and worked it layer by layer: who decides, how it senses, how a decision becomes motion, how it's powered and connected, what data moves, and now what happens when any of it fails. Recovery decides whether all of that earns an operator's trust or loses it on the first bad Tuesday. Give every failure mode a destination and a recovery, and the system you spent five parts making intelligent stays intelligent even when it's hurt.