In Lesson 24 you gave the perfect-world numbers their margin. You decided where the calculated answer stopped being true and how much buffer it needed before it became a spec. That was judgment about the edges. This lesson is the calc itself, run for real, with the inputs confirmed and your name going on the result.
Final engineering isn't more math than solutioning. It's the same math with the inputs confirmed and the tolerance pulled tight. The gap check is the deliverable that keeps a carton collision out of the proposal. Michael's seen the transfer gap missed in proposals more than once, and every miss is a collision on every cycle out in the field, found at commissioning with the customer standing there. The calc would've caught it in fifteen minutes at the desk.
By the end of this lesson you should be able to run the Product Spec Calc in the sixteen-step dependency order without producing a right-looking answer to the wrong check, prove the sorter can run this mix at this rate by clearing both the model-minimum and the geometric gap, name the three levers when it fails, run the 90-degree transfer cycle against the trunk-line gap, account for the throughput a merge quietly loses, and hand the controls team a setpoints package they can build from.
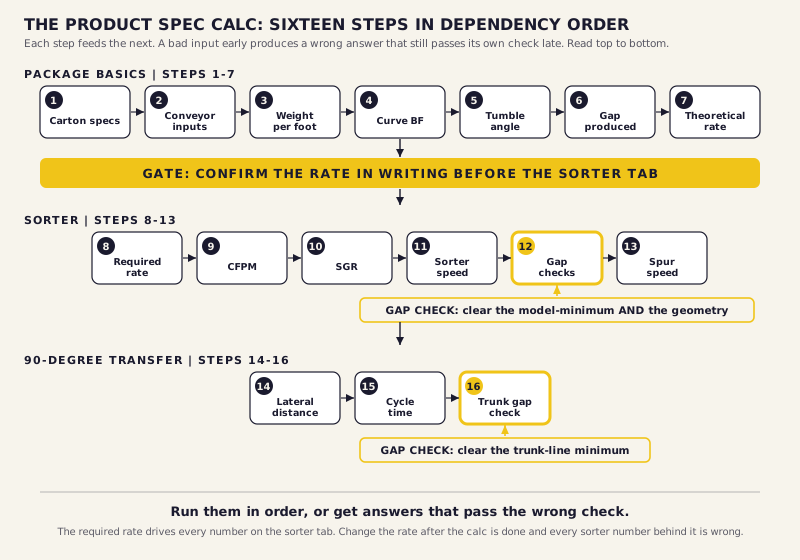
Every calculation in the spec calc has dependencies. Run them out of sequence and you get wrong answers that pass their own checks but are wrong for the wrong reasons. The Calculation Logic Guide lays the whole thing out in Section 5 as a sixteen-step dependency reference, and that guide is the formula authority for this lesson. Keep it open next to the calculator. What follows here is the shape of the sequence and where the gap checks sit, not a reprint of its tables.
The sequence runs in three groups. Package basics is steps one through seven: carton specs entered, global conveyor inputs set, then weight per foot, minimum curve between-frame width, tumble angle, gap produced, and theoretical rate confirmed. The sorter is steps eight through thirteen: the required rate entered, then CFPM, SGR, required sorter speed, the gap checks, and takeaway spur speed. The transfer is steps fourteen through sixteen: lateral distance, cycle time, and the trunk-line gap check.
One rule sits under all of it. The required rate drives every number on the sorter tab. So the rate gets confirmed with the customer in writing before you enter it, and if the rate changes after the calc is done, every sorter number behind it's wrong. Get the rate in writing. Then run the calc.
Running the sorter tab before the required rate is confirmed in writing. CFPM is driven entirely by rate. If the rate changes after the calc is done, every sorter number behind it's wrong, and they'll all still pass their own checks. You'll be looking at a clean tab full of numbers that answer a question the customer already moved off of. Get the rate in writing, then run the calc.
The sorter section answers one question: can this sorter run this product mix at this rate without a gap failure? Everything on the tab builds toward that. The calculations run in sequence and each one feeds the next, so a bad input in CFPM produces a wrong required sorter speed, which produces a wrong gap, which produces a wrong pass or fail. Work them in order.
CFPM is the minimum conveyor speed that physically moves enough cartons per minute to meet the rate. It runs off carton length and a 1.15 safety factor, one column each for the min, max, and average carton, and the max carton's length sets the highest floor. It's the floor, never the run speed. At Riverside's confirmed 20 CPM, the guide's worked figure comes out at 38.3 FPM on the max carton.
SGR is the speed-gap ratio, the pitch over the carton length. It tells you how much faster the sorter has to run than the induction belt to hold the gap that already exists. The smallest carton with a large gap produces the highest SGR, which is exactly why the min carton is a binding case and not the harmless one it looks like on the sheet.
Be the smallest carton at the sorter induction. You're short, so the gap in front of you is huge relative to your own length, and that ratio is your SGR. It's the highest in the mix, which means you're the carton that demands the fastest sorter speed. The min carton looks harmless on the spreadsheet and it governs the design at the sorter.
Required sorter speed is SGR times CFPM. And here's the trap: you check all three carton columns, because the max carton produces the highest CFPM and the min carton produces the highest SGR. Whichever combination gives the highest required speed governs, and it's not always the column you'd guess. Then the gap check runs every time. The gap produced at the sorter's operating speed has to meet or exceed two separate numbers: the sorter model-minimum gap, which is width-based off the manufacturer's spec card, and the gap required by geometry, which is the max width times the sine of the divert angle plus two inches of safety. Both. Not the higher of the two by luck. Both, on purpose. Last on the tab, takeaway spur speed is the sorter speed divided by the cosine of the divert angle. It's always higher than the sorter, because the carton leaves at an angle and the spur has to hold the carton's velocity in the direction of travel. And because the spur runs faster, the takeaway sometimes can't be the same conveyor type as the one feeding the divert; if a type change gets forced on you, treat it as a signal and ask whether the inbound conveyor's margin of error is too tight.
Figures from the Calculation Logic Guide, Section 3. Reference the guide for the full formula set; these are the worked steps.
When the gap check fails, you have exactly three levers on the sorter side, and you know which one you're pulling before you go back to the customer.
There's a fourth move that lives on the induction side: increase the gap at induction by adjusting the upstream belt speeds, which feeds a bigger gap into the sorter. Whatever you pull, name it to yourself first. A number that got fixed by a lever nobody chose on purpose is a number that comes back.
Your sorter gap check fails: the gap produced at sorter speed comes in below the model-minimum gap. Name the three levers you could pull to fix it, and name one consequence of each. Then say which lever you can't pull on your own.
If you're about to prove a sorter, then run the gap check for the min, the max, and the average carton, and read all three sorter columns, not one. Tradeoff: three passes instead of one. Verify: the max carton gives the highest CFPM and the min carton the highest SGR, so the carton that governs your required speed isn't always the one you'd guess. Check all three and the binding case reveals itself at the desk, before the field does.
Every 90-degree transfer in a system is a potential collision point. A transfer lifts a carton off the trunk line, moves it laterally to an adjacent conveyor, and lowers it, and during that whole cycle the trunk line is still running. The calc confirms whether the gap on the trunk line is large enough to finish the cycle before the next carton arrives. The mechanical side of the transition, the transition roller, the tapered guardrails, the O-ring drift and the max-carton clearance, is a design problem you handled back in Lesson 15. This is the gap-and-cycle arithmetic that proves the timing.
Three steps. Lateral travel distance is the between-frame width plus half the difference between the overall width and the between-frame width, which puts the carton in its worst-case position on the side opposite the divert. Transfer cycle time is the lift time plus the lateral travel time plus the lower time, the whole window the transfer is busy and the trunk can't safely deliver the next carton. Minimum gap required on the trunk line is the cycle time times the trunk speed over five, plus four inches of safety. Then you compare that minimum against the gap you actually have. If the available gap is less, you've got a carton collision on every transfer cycle, and the options are to reduce the trunk-line speed, increase the carton gap upstream, or specify a faster transfer.
Figures from the Calculation Logic Guide, Section 4. Run it for every transfer in the system, not just one.
The four-inch margin in that last formula is a minimum, not a target. On critical transfers Michael recommends eight to ten inches more, for the variation in product presentation and the belt slippage the perfect-world number never included.
Every 90 degree transfer in a system is a potential collision point. The calculation tells you the minimum gap required. If the gap on the trunk line doesn't meet that minimum, you've got a carton collision on every transfer cycle. I've seen this missed in proposals more than once. Run this calculation for every transfer in the system, and on the critical ones don't stop at the four-inch safety margin, add eight to ten inches for product presentation and belt slippage.

A merge is not free throughput. The PLC releases one lane at a time so products zipper into single file instead of colliding at the merge point, and every lane switch creates a dead time, a gap, in the merged stream. The gaps, the delays, and the lane-switching timing all have to be accounted for in the overall capacity calculation. Skip it and the system's real throughput comes in under the sum of the lane rates, and you find out on the floor instead of on paper. The merge is a throughput constraint, not just a place where two lines become one.
Everything you've proven in this lesson becomes the setpoints package the controls team builds from, and every value belongs on the installation drawing. Belt speeds by section. VFD ramp rates at the decline, where the ramp time you set in Lesson 24 to control the inertial energy at belt stop finally gets its number, because the VFD calculator is a final-engineering tool. PLC delays at the transfer points. Accumulation zone release modes. This package is the bridge out of Part VI. What belongs on the drawing itself, and how it gets called out by trade, is its own subject and it waits for Lesson 28. The controls-side implementation of those ramp times and delays as PLC parameters is Lesson 20's. Here you assemble the values and prove them.
Run the full sequence on Riverside. The required rate is 20 CPM, and Dana put it in writing when she asked that the new system be designed for 20. So the rate gate is cleared, and you can enter the sorter tab. Package basics first, then the sorter sequence above, then the 90-degree transfer against the trunk-line gap. Every worked number in this lesson is Riverside's or the guide's, so nothing here is invented, and the sorter clears both gap checks at 55 inches produced against a 9-inch model minimum and a 9.5-inch geometric requirement.
Then the number that moves. Ray's in-room estimate for the WMS response was half a second, and he flagged it himself as a guess. His correction email confirms one second under peak load. The scan trigger fires at the carton's leading edge, and the WMS query transmits from a point 24 inches downstream of that trigger. Use the guide's Lookup Time formula, distance over twelve divided by speed over sixty, to find how far a carton travels in one second. At the belt speed in the guide's own scan example, 120 FPM is two feet per second, so a carton covers 24 inches in that one-second window. The distance from the transmit point to the divert has to cover it. If it doesn't, the layout or the belt speed changes, and the moment the belt speed changes, the gap checks change with it, because speed feeds the gap produced.
Produce the capacity proof and the setpoints package: the gap-check pass or fail record, plus the belt speeds by section, the VFD ramp rates, the PLC delays, and the release modes. Re-run the scan-to-divert distance at the confirmed one second, not the half second. Put it all in your Riverside note. This is the second piece of the validation package.
This is where the calculator stops being the answer and becomes the proof. Everything before Part VI built the design; this lesson runs the math that Lesson 10 deferred, now with the inputs confirmed and the tolerance tight, and it decides one thing: does the system actually hit its rate, and does the gap survive every check? Run the sequence in order and the gap checks hold, and you can sign the number. Run it out of order, or skip a check because another one passed, and you've written a right-looking answer to the wrong question. The capacity proof and the setpoints package you just built are the parts of the validation package that let you stand behind the rate. Prove it before you sign it, and the rest is detail.