Riverside's maintenance lead has been in this building for twenty years, and he's watched two conveyor systems go in and come back out. His name is Michael Collins, twenty years on that floor, no relation to the Michael Collins whose field notes run down the margins of this program. When you asked him what happened to the last two systems, here's what he told you.
"First one was a pneumatic accumulation system. Worked fine for about four months. Then the compressor started having issues. Air pressure would drop during peak volume and the zones would stop releasing cleanly. Maintenance calls started coming in. Nobody was trained to work on it. The vendor sent someone out twice. After that the operators started pushing product around the jammed zones by hand. Six months after install it was off and we were back to manual."
"Second one. When anything downstream slowed down, everything stopped. The whole line. Every time. We lasted three months before it came out."
Neither system died because a formula was wrong. The first died because the air it depended on wasn't stable and nobody on site could work on it. The second died because one slow spot stopped everything behind it. Both were maintenance failures wearing a design costume. A system can hit every number on paper and still be off the floor inside a year, because nobody designed for how it gets kept running. Reliability engineering is that design work: walk the system and find what breaks, tell how often it breaks apart from how long it's down, rank what each break does to the whole line, and match all of it to the maintenance team the customer actually has.
By the end of this lesson you should be able to walk a system component by component and find how each part fails before the customer does, tell how often a part fails apart from how long it's down, rank components by what their failure does to the whole line, decide which parts earn a spare on the shelf, and design the reliability around the maintenance team the customer actually has instead of the one you wish they had.
Failure Modes and Effects Analysis is the carton exercise turned around. Back in Lesson 5 you learned to imagine you're the carton and trace its journey through the system, asking at every point what could go wrong for the package. FMEA points that same discipline at the machine instead of the product. You walk the system component by component and ask five questions of each one: how can this fail, what happens to the system when it does, how likely is it, how bad is it, and how will we know.
You already know real failure modes. You met most of them earlier in this program, you just weren't collecting them yet. The O-ring at a transfer dries out, loses elasticity, and lets the stopping position drift until cartons start hanging up in the takeaway, that's a failure mode straight out of Lesson 15. The shared compressor that drops air pressure at peak and starves the accumulation zones, that's a failure mode too, and it isn't hypothetical, it's Riverside's first dead system. Belt tension relaxes over time and slippage climbs, there's another. FMEA is the habit of writing all of them down in one place before the customer finds them for you.
The value isn't the list. It's what the list lets you do next. Once every failure mode is on the page you can rank them, and ranking is what lets you design the worst ones out or protect them first, instead of meeting them in the field one service call at a time. The next two sections are how you rank.
Two numbers describe how a single component behaves, and they pull in different directions. MTBF, mean time between failures, is how often a component fails. MTTR, mean time to repair, is how long it's down when it does. Keep them separate, because they don't move together. A part that fails once a year but takes a full shift and a long-lead spare to fix can hurt the operation more than a part that fails every week but is back in five minutes. Failure frequency on its own tells you almost nothing about what a failure costs.
Criticality is the third question, and it sits on top of both. It asks what a component's failure does to the rest of the system. Some failures stop everything. Others degrade one lane while the rest of the line keeps running. On the system you've been designing for Riverside, the sorter and the merge are single points of failure, when either one goes down the whole line stops. A single takeaway spur going down only slows the door it feeds. Same building, very different criticality, and that difference is the whole reason you rank.
One thing about the numbers themselves. MTBF and MTTR are targets you set with the customer, tied to what their operation can actually tolerate, not generic figures you inherit off a spec sheet. What counts as an acceptable time-to-repair for a line that runs one shift is different from one that runs around the clock. Set the target against the operation, the same way you set margin against the environment back in Lesson 11. Pulling a number off a datasheet and calling it a target is how you end up defending a reliability figure that never fit this customer. Where those targets get written down for the customer to sign, the proposal's maintenance section, is a later lesson. Here you set them; you don't write the proposal.
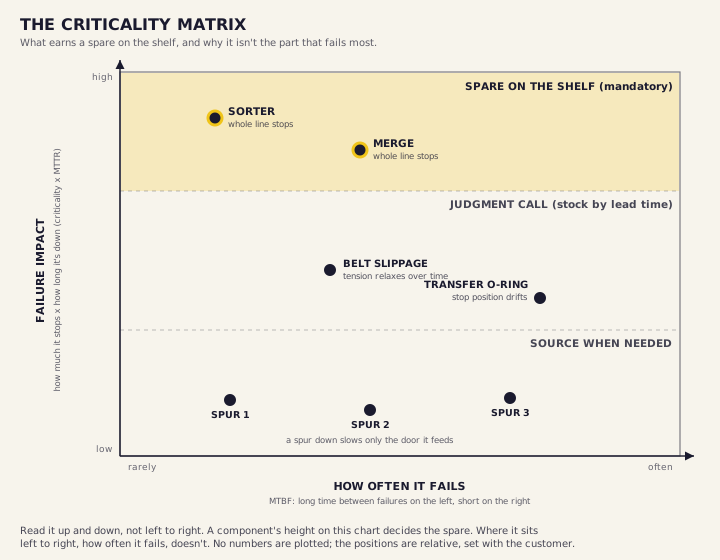
The figure below puts the two ideas in one frame. Across the bottom is how often a component fails. Up the side is what its failure costs you, how much of the system it stops times how long it stays down. Plot the Riverside components and the pattern is hard to miss.
Holding spares for whatever fails most often. Frequency is the wrong sort key. A part that fails weekly but is in stock and swaps in five minutes needs no shelf spare. The rare failure that idles the whole line for a week while a long-lead part ships is the one that earns the shelf. Stock by criticality and lead time, not by failure count.
Start with the mistake above, because it's the common one. You don't stock a spare for every part, and you don't stock by what fails most. You stock by criticality and by lead time. Walk it through with the two numbers you just learned. A part that fails often but is on the shelf and swaps in five minutes needs no held spare, you'll have it back before it matters. The part that earns a spare on site is the rare one whose failure stops the whole line and whose replacement is weeks out on a truck. Frequency is the wrong sort key. Criticality times lead time is the right one.
On the Riverside system that means the high-criticality, long-lead parts at the sorter and the merge are your candidates for spares held on site, and the low-criticality spur components you source when you need them. That's the whole spares strategy: not one of everything, and not one of whatever breaks most, but a short list built off the criticality ranking and the lead times.
A system is only as reliable as the team that keeps it running, and Michael's team is one person, reactive, fixing things when they break. That's the design input that matters most here, and it's the one engineers skip. Design for that reality, not for a maintenance department Riverside doesn't have. In practice that means fewer failure modes to begin with, longer-MTBF components where the criticality is high, and parts one person can change with a wrench and no ladder. It can mean reaching for a more durable, sometimes more expensive technology than the product profile alone would call for, an MDR system where you'd have specified something cheaper, because the cheaper thing needs a maintenance program that isn't there. Lesson 12 named that tradeoff plainly: for a customer with no maintenance, the more self-contained system may be the right call, even though it typically costs more.
Then there's the physical side, the part that's easy to miss on a drawing, and it's important enough that Michael takes it below. Whether that one person can safely reach and lock out the part he's replacing, the guarding and lockout side of maintenance access, is the next lesson. This one owns whether the part can be reached and replaced at all; the next owns whether reaching it is safe. And the service arrangement itself, the response commitments, the warranty lines, who owns spare-parts handover, comes later still. Here you set the spares strategy and the reliability targets; you don't write the service agreement.
People match the conveyor to the product and forget the maintenance access. Another consideration is access. If you've got two units side by side, can you even get a wrench in there? Can you pull a motor or a shaft if you need to? Is there room to swap a component without taking half the line apart? A design that's perfect on the product profile and impossible to service is a design that'll be down and staying down the first time it breaks. You need to understand this before it's steel on the floor.

Be Michael for a second. It's a weekday, you're the only maintenance person in the building, and a motor on the decline just quit. Can you reach it? Can you get it out without a second person and a ladder? Is the spare on the shelf or three days away? The reliability of this system isn't a number on your analysis. It's whether the one person who has to fix it actually can.
One component in your system fails rarely but takes a full shift to fix and needs a long-lead part. Another fails twice as often but is back in five minutes with a part on the shelf. Which one gets the spare held on site, and why is "the one that fails most" the wrong instinct?
If you're about to lock a technology selection or a layout, then ask the customer not just whether they have a maintenance team but what that team actually does, reactive repairs only or a real PM program, one person or a shift. Tradeoff: the honest answer can push you toward a simpler, more durable, sometimes more expensive design like MDR where you'd have reached for something cheaper. Verify: match the conveyor to the maintenance reality, not just the product profile. The system that survives is the one the customer's actual team can keep running.
Build the reliability plan for Riverside. Michael said it straight in that first meeting: "I just want to make sure somebody actually thinks about how this thing gets maintained and not just how it gets installed." And he told you why it matters to him: "if you design something that my one maintenance guy cannot keep running, we will be back here having this same conversation in two years."
Start the FMEA from the failure modes this site has already shown you, then add the ones the program taught you, rank them against the Riverside architecture, and decide spares for a maintenance team of one. Set the MTBF and MTTR targets with Dana and Michael, tied to what a single-shift operation can tolerate. The starter table below is the shape of the deliverable, filled with the modes you already have.
Finish the table in your Riverside note. Add any failure mode you'd flag, mark its criticality, decide the spare, and write who you'd set each target with. No invented numbers. Targets are set with the customer.
| Failure mode | Effect on the system | Criticality | Spare held? | MTBF / MTTR target |
|---|---|---|---|---|
| Sorter down | Nothing sorts. The whole line stops. | Whole line | Yes, long-lead parts on the shelf | Set with Dana + Michael |
| Merge down | The feed to the sorter stops. The whole line stops. | Whole line | Yes, long-lead parts on the shelf | Set with Dana + Michael |
| Compressor air-pressure drop at peak | Accumulation zones stop releasing cleanly. Riverside's first dead system. | Whole line | Design it out where you can; spare the parts you can't | Set with Dana + Michael |
| Transfer O-ring drift | Stopping position drifts, cartons catch the takeaway frame. | Local | No, stocked wear part | Set with Michael |
| Belt slippage as tension relaxes | Gap shrinks below the calculated gap over time. | Local | No, adjust and re-tension | Set with Michael |
| Takeaway spur down (Door 1, 2, or 3) | Slows the one door it feeds. The rest of the line runs. | Local | No, source when needed | Set with Michael |
Notice the sort. Criticality and lead time put the sorter and the merge on the shelf and leave the spurs to source when needed, and the target column carries no numbers, because MTBF and MTTR are targets you set with the customer, not figures you claim for a piece of equipment.
This is Lesson 26, the third validation of a design that already works on paper. Lesson 25 proved the system hits its rate. This lesson asks the harder question: what happens when a piece of it breaks, and can this customer put it back? The FMEA, the criticality ranking, the spares list, and the MTBF and MTTR targets you set here are the reliability plan, the third piece of the validation package. And every one of them answers back to Michael, the one person who has to keep this thing running. Get the reliability right for the team that's actually here and the system survives its first year. Get it right for a team that doesn't exist and you've designed Michael's third dead system. Design for the maintenance you have. Carry that out of this lesson and the rest is detail.